Pages

May 22, 2019

Hobbit Costume: Simplicity 8771 Cloak

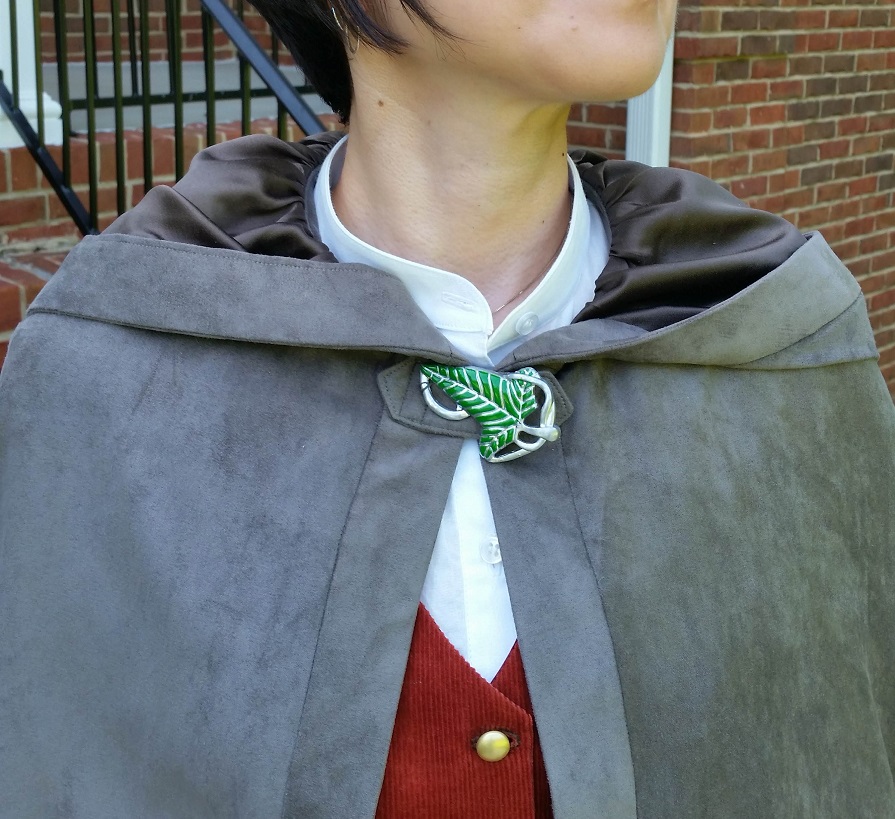
ホビットコスチュームのトリはマントです。
(でもベストの下に着てる衿のついてない白シャツも作ったのよ。写真撮り忘れただけ)


ちなみにこのホビットコスチュームを作ったのは、ルネサンスフェアと呼ばれる中世ルネサンスヨーロッパの催し物に行くためでした。映画村を想像してもらうとわかりやすい。甲冑を着た騎士が馬に乗って槍試合をしたりする。(砂漠地帯でも行きました。
今ではすっかり日本のコスプレ文化がアメリカでも一般的になって、「コスプレ(Cosplay)」という言葉で知られるようになったけど、日本でコスプレがはやる前からアメリカでは中世の衣装を着て中世文化を楽しむ人たちがたくさんいたのです。


せっかくマントも作って、ブローチもアマゾンで購入したのに、当日は気温が30度ぐらいあったのでマントを着るのははあきらめました。ちょっと残念。

I did make the collarless white shirt under my waistcoat for this but alas no photos.

Anyway, the Hobbit costume. I made the costume to go to a Renaissance Faire. I'm still not sure if Hobbit costume is appropriate for Ren Faire but I think more people wear fantasy costumes these days than actual Renaissance costumes at Ren Faire. Reading the post from 2016 about going to a Ren Faire in the Desert, it's funny to think that I made the Hobbit costume this year that I thought was way beyond my sewing skill back then.


The cloak pattern is Simplicity 8771. I'm sure some advanced sewers would laugh at me using a pattern for a simple cloak, but when you can buy the pattern for $2, that's worth it. Good to be back in the U.S. and being able to buy patterns for $2.


The pattern piece was actually bigger than the tissue paper so this pattern required taping of the pattern. I made the short version (View B). It's a unisex, one size only pattern.


The fabric is a 100% poly faux micro suede. Unfortunately, it was too hot to wear a polyester cloak on a nearly 90 degree weather in Deep South so the cloak was never worn at the Ren Faire.


The hood has a facing around the edge but it's unlined so the center seam is exposed. I am ok showing my serger seam at the hood's center seam (and also the center back) but if you are a more strict costume maker, you will need to think about the proper seam finishing.


I bought this Fellowship leaf brooch on Amazon for like $6. You know, you get what you paid for. I did not like the gold color on the leaf's stem and the general paint job so I painted it over myself with some model car paint I had.


I thoroughly enjoyed making the costume. It is so exciting to think that the whole outfit was made by me! Can I call myself a cosplayer now?

Worn together with:
Self-drafted waistcoat.
Vogue 9032 pants.
Butterick 5526 shirt.

May 21, 2019

Hobbit Costume: Vogue V9032

ベストに続いては、ホビットパンツを作りました。ホビットのパンツは短いのです。
シャツの袖もホビット用に短めに作ったんだけど、中途半端になってしまったのと気温が30度ぐらいあるのとで、袖はまくっておきます。
年とって、O脚がひどくなっているよう。立ち姿がすっかりおばあちゃん。


Worn with my self-drafted waistcoat is a pair of Hobbit pants. Hobbits wouldn't have a zipper fly but let's call it a modern-day Hobbit pants.


The pattern is Vogue V9032. I made a View C: flat front, fitted pants. The back leg has a princess seam? that goes from waist to hem.
I cut a size 14 at waist and tapered to size 12 at hip.
The pant legs were shortened by 10.5" from hem to accommodate my short legs and Hobbit's short pants.


The muslin had a huge amount of excess fabric at the back leg. Thanks to the 2-part back leg, I was able to cut off the horizontal dart at the back leg without a difficult pattern adjustment. the dart is 1" at the widest part.
I also shaved off at the hip about 1/8" both front and back.
I also ended up taking in at the waist, so next time I would just start from size 12.


After making my Ginger jeans, dress pant making feels much simpler. This one does not have a back pocket or belt loops so the construction was pretty quick.


I was so glad that I had made the Ginger jeans before this one because Ginger definitely has a better instruction and I pretty much followed the Ginger.


If this pair were a dress pants, I think it's too lose around the legs for a "fitted" silhouette but for Hobbit pants, this would do.


The fabric was a Robert Kaufman 7.5 oz stretch twill. I didn't intend to, but this whole ensemble (the waistcoat, shirt, and the pants) ended up all Robert Kaufman fabric. The fabric for the pocket is Amy Butler cotton poplin, left-over from my New Look 6184 dress. Just like Ginger jeans, the pocket bag goes all the way to the zipper so it's nice to have the "tummy stay."

May 20, 2019

Hobbit Costume: Self-Drafted Waistcoat

ロードオブザリングの主人公、ホビット族のフロド・バギンズのコスチュームを作りました。
ベストは型紙がなかったので、私用の基本の型紙から立ち上げました。ムムム、力作(笑)
布はコーデュロイを使ったんだけど、後ろ見ごろ、逆さまで布を切ってしまったために布のてかり加減が違うけど、それも愛嬌。


I made a Frodo Baggins costume (from The Lord of the Rings).
Let's start from the waistcoat.


Since I did not have a pattern for a waistcoat, I drafted it from my bodice sloper. By the way, my costume-making is not aimed to be as close as the original, but rather something that looks similar that I can sew.


It has a princess seam to the shoulder and pretty similar to my Zoe vest. The black marks on my muslin below is my pocket placement mark.


To wear over a shirt, I let out the side seams.


Then angled the front hem.


This (below) is where I should have noticed the mistake. I placed my center back bodice upside down...


The upside down center back wouldn't have been too much of an issue if it hadn't been a corduroy. Oh well, at least it was a back bodice. The fabric is Robert Kaufman 14 wale 100% cotton corduroy. I have enough fabric left to make an A-line skirt or something for the fall/winter season.


This is my very first welt pocket. I was a bit lazy so the pockets are actually fake.


But other than the pocket bag, it has all the component of a welt pocket.


I think I did rather well for my first time.


I recently bought this Simplex expanding button gauge and I love it. No calculation necessary and so easy to use.


And here is my "design" and my notes to make the waistcoat and the welt pocket. I basically watched a few YouTube videos of waistcoat making and welt pocket making and made notes of the order of construction.


The waistcoat is lined with rayon lining.


The welt at the chest is a bit tilted but otherwise I am very happy.


And the upside-down center back. It almost looks like part of a design, doesn't it?


I made the shirt as well (Butterick 5526) but forgot to take a single picture.

April 7, 2019

Ginger Jeans: The Kaufman

ジーンズ作成が続きますが、前回のジーンズは、今回のジーンズを作るための試作品だったのよ。今回のが本番なのよ。

私、足が短いからスキニージーンズが似合わないのでやっぱりジーンズは昔ながらのブーツカットが好きなのです。まだまだフィットに問題は残るけど、自分でジーンズが作れるということにもう大満足です。

ちなみに在宅で仕事するようになって、全くヒールのある靴を履かなくなったのでこの赤い靴履くの2年半ぶりぐらい?なんか、キツイ。


I was happy with the muslin, so I made the full-length Ginger Jeans that I originally intended to make.


The pattern is, as you know, the Ginger Jeans from Closet Case Patterns. I used the mid-rise version pattern for the waist/hip, then the flare pattern for the thigh down.


I cut a size 8 and shortened the flare pattern by 4". (The pattern says it's drafted for the height 5'6". I am 5'3" and particularly short legged.)

One of the good things about this pattern is that the back pocket pattern also comes in multiple sizes, it's not one-size-fits-all. I am using a size 6 back pocket pattern and size 6 back pocket placement.


While I wanted the flare version and loved other people's flare version, the pattern looked a bit too flare for me, so I reduced the flare by 1" each side (4" total reduction in circumference) for a more boots cut style .

I ended up letting out the top of the side seams for more room for the waist but I think I overdid it, it is now a bit too loose.

I also trimmed about 1/2" at the top of the yoke at the center back for sway back and deepened the back crotch curve just like I did on my muslin.

Still got a lot of problem with back legs but that's for another day.


The fabric was Robert Kaufman stretch denim, 8.6 oz, which has 4% Lychra. I washed it twice before I cut the fabric but still it made my hands blue every day while I was sewing. I will have to wash them a few more times before I can wear them safely without transferring dyes everywhere.

The lining fabric happened to also be Robert Kaufman fabric. It was a leftover fabric from my Butterick B5526 shirt.


The legs of the flare pattern are looser fit than the skinny pattern and they feel a bit more trouser-like because of that. I think the next time, I will use the skinny pattern and just flare out the legs from the knee.

I have joined the Pattern Review's jeans/pants contest and I'm really glad I was able to finish this pair on time!

April 5, 2019

Storm Shelter

竜巻が通る地域に越してきたので、我が家にはストームシェルターがあります。地下室の一番奥深い部分にある、畳2畳ぐらいのいわば物置みたいな部屋です。小汚いし、暗いし、大昔の牢屋みたいなだったので、ペンキ塗ってきれいにしました。


When I was looking for a house in the Deep South, I was surprised how many houses had a storm shelter. I never lived in the area that needed a storm shelter so it was a new thing for me. There are many earthquakes in Japan but there is no prior warning for earthquakes so a shelter is useless, there are hurricanes in the coastal South but a storm shelter is probably an overkill, then there is almost no natural disaster in the Desert Southwest or in England.


Anyway, now we have one. It's a very narrow, unfinished room with a heavy door in the deepest part of the basement. It originally looked like a windowless prison cell from the 1920s. Dark, dusty, and cold.


Since we are in the tornado season, we wanted to make this room a bit more "habitable" so we switched a light bulb to an LED light, sealed the cinder brick wall with Drylok and painted with a semi-gloss paint, and Epoxied the floor with freckles.


Really happy how it turned out. Nice clean room. We just need a couple of chairs and a 72-hour kit.

April 1, 2019

Ginger Jeans Day 7: Trying On

ジーンズはいてみたとこ。とてもジーンズらしく出来上がって、うれしい。
スキニージーンズの型紙を布が足りないのでカプリ丈にしてあるんだけど、普通のジーンズ丈だったら多分ふくらはぎ入らないだろうな、と思う(爆)


The weather was perfect for capri-length pants so I wore my finished Ginger muslin all day to try them out.

The front belt loops look unbalanced but they are in fact equal distance from the center front...


The pattern is Ginger Jeans from Closet Case Patterns. There are variations to this pattern, but I bought the mid-rise version, and used the skinny leg pattern.

Fabric is a left-over stretch denim from my Jalie Eleonore: 5% Lycra. I had less than a yard left so inevitably, the jeans were turned into capris.


I cut a size 8 at waist, tapered down to 6 around the hip, then back to 8 for legs. However, it turned out to be too tight around the low butt, so I ended up letting out the side seams next to the back pocket. I will cut a straight size 8 next time.

I used the pocket placement for size 6 and I think it worked.

(Please ignore a plastic bag stuck in my back pocket. I was on the way to take the dog out for potty.  My photographer never tells me these things...)


I trimmed the top of back yoke about 1/2" at center back for sway back, but the top of the back waistband is still slightly too loose so I will have to adjust the waistband pattern next time.

I also deepened the back crotch curve for a more L shaped curve to fit my low butt.

I still have a lot of wrinkles on my back leg, but I'm fine with that at this point.

March 31, 2019

Ginger Jeans Day 6: Muslin Finished

ジーンズの試作品完成~。
試作品とは言え、カプリ丈ジーンズとして普通に着れます。
っていうかもうこれ着てお出かけしたし。


I am just so very proud of my muslin Ginger. My very first proper pants and they are totally wearable and totally look like a real thing.

Anyways, let's start with a button hole.
I wanted to use the key hole shape automatic button hole on my Janome.


I tried different needles and different tensions but basically the topstitching thread just did not work so I used the regular thread in orange.


Belt loops got hammered down. It's amazing how a little hammering tames the thick fold of denim fabric.


 Front button is attached. Looks so proper.


I used my Prym Vario pliers to install rivets. It's a bit tight to fit the fabric in the pliers but doable and I don't have to worry about rivets going in crooked.


Muslin finished.
Wore them all day yesterday. A bit gaping at the back waist but other than that, I am very very happy with the result.
Now, I have to trace the pattern again for straight size 8 and start this process all over.