Pages

December 20, 2015

Sewing Room Peg Board

この時期は、結婚記念日、クリスマス、そしてオットの誕生日がたて続けにやってくるので、普段はイベントに無関心な私たちも、なんとなくプレゼントを贈りあったりします。
お互い欲しいものは自分で買うし、欲しいものにはこだわりがあったりするのでプレゼントを贈りあうと言っても、日常普通に買うものを「プレゼント」と称して買ってあげるだけなんだけど。

ちなみに私がオットにあげたのは、水筒。(奴は毎日会社に水筒を持っていく人なのです)

私がもらったのは、携帯電話につなげるワイヤレススピーカーと、真空パック用の袋。

その上なんと、裁縫室の壁にかけるペグボードも作ってくれました。
This time of the year, we have our anniversary, Christmas, and MOTH's birthday, so even though we are not big into events, we kind of give gifts to each other.
We usually like to buy things we want and we are really picky about things we want, so we usually just buy ordinary things and call it a gift.

I bought him a water bottle. A stainless steel, vacuum insulated, 32oz one, that is supposed to keep cold drink cold for 24 hours and hot drink hot for 6 hours. (He takes his thermos to work every day.)

He gave me a Bluetooth speaker and Food Saver bags.

And then, he made me a peg board for the sewing room wall. It is 5 feet wide and 3 feet high. The bracket kit came with plenty of hooks and what not.
My sewing room now looks like a proper sewing room.

December 19, 2015

How to Make a Key Chain

職場のホリデーパーティで職員に配るキーホルダーを作りました。

作り方:
1.布はトーカイで買ったちりめんを使いました。薄手なので裏に芯をつけました。
The fabric is rayon Chirimen crepe. Since it's rather thin, I added fusible interface.
 2.布を切って折りたたみ、30センチほどに切ったストラップ用のひもにのりで仮留め。
I am using a 12"-long, 1"-wide cotton webbing. This is where I temporarily glued down the cut and folded fabric.
 3.紐に布を縫い付ける。ミシンの針の位置を調節できる機能大活躍。
Edge-stitched the fabric on the webbing. Love my fancy sewing machine's needle position function and blind stitch foot.
 4.切ったところがほつれないように、ひもの端にほつれ防止用の液体をつけて乾かしているところ。
Fraychecking the cut edges.
 5.金具を取り付ける。
Key chain hardware.
 6.出来上がり。ちりめんストラップキーホルダー。
My precious Chirimen key chains.

December 18, 2015

Force Awakens

縁があって、スターウォーズの新作を公開初日の最初の回に見ることができました。
それも3Dで。3Dは頭痛くなるから好きじゃないんだけど、最初の10分以降はそれほど気にせずにみることができました。
コスプレーヤーを楽しみにしてたんだけど、ジェダイがちらほらいた以外は皆さん普通の格好で、ちょっと残念。(まぁ、私も仕事帰りの服だけど)
Thursday morning, I noticed that the electric message board over the highway said "Trust the Force, but buckle up." Turns out, the Department of Transportation likes to put the message with a slight joke to get drivers' attention, and it was not their first time using movie/cultural reference.

I was working on a deadline at work all morning, and had to skip lunch to get everything ready by the 3 o'clock meeting. When I was done with the meeting, I got a message from MOTH that he had brought two extra sandwiches home from his lunch meeting. Yes! I don't have to cook dinner! Since I was so starving, I worked my 8 hours and left the office at 4.

I got home around 4:30. MOTH was already home (it was his last day of work until after the New Year's). I was about to go change my clothes to walk the dogs, and he got a  phone call on his work cell phone. He goes: "Yeah, I'm already home.... Oh really? That's great... Do you want me to pick you up? ...Ok, I'll see you in a bit" then he turned to me and said "We are going to the Star Wars movie tonight, so don't change your clothes." I guess the Force was with me, huh? I shoved the sandwich in my stomach in 10 minutes ;)

So, yeah, I was able to watch the new Star Wars movie on the opening night for the first showing. It feels like I was part of the history, considering it was probably the biggest movie opening ever.

What was disappointing though was that there were only so few cosplayers at the theater. I was expecting the whole cosplay party, but alas, no. There were a few Jedi and a Padme, and that was it.

Anyway, it had been a couple of years since we went to a movie theater last so it was fun.

December 16, 2015

50 Grapefruits

寒波が来たので大急ぎでグレープフルーツ収穫しました。50個採れました。

December 12, 2015

Green Minoru Jacket Day 11: Completed!!!

ミノルジャケット完成しました!シェーのポーズで。
防寒仕様ではないので雪が降る中で着るには寒いけど、砂漠地帯ではこれで冬を越すのにちょうどいいぐらい。MA-1ジャケットに感化されています。


My Minoru jacket is done!

So, let's summarize before I forget.
The pattern is Sewaholic's Minoru Jacket pattern. A made a view A, which has a hood that can be hidden in the zippered collar.
I cut a size 6 and narrowed at hip/hem to size 0, which is my typical alteration for Sewaholic patterns. I also shortened the bodice and sleeves by 1" (I'm 5'3").
I really like the length. It covers my butt nicely but not too long. I also like the length of the sleeves (thumb length).
The fabric is a cotton twill that has kind of fuzzy/velvety texture on one side. I used the plain size as the right side and velvety side as wrong side. The lining is orange Ambiance.
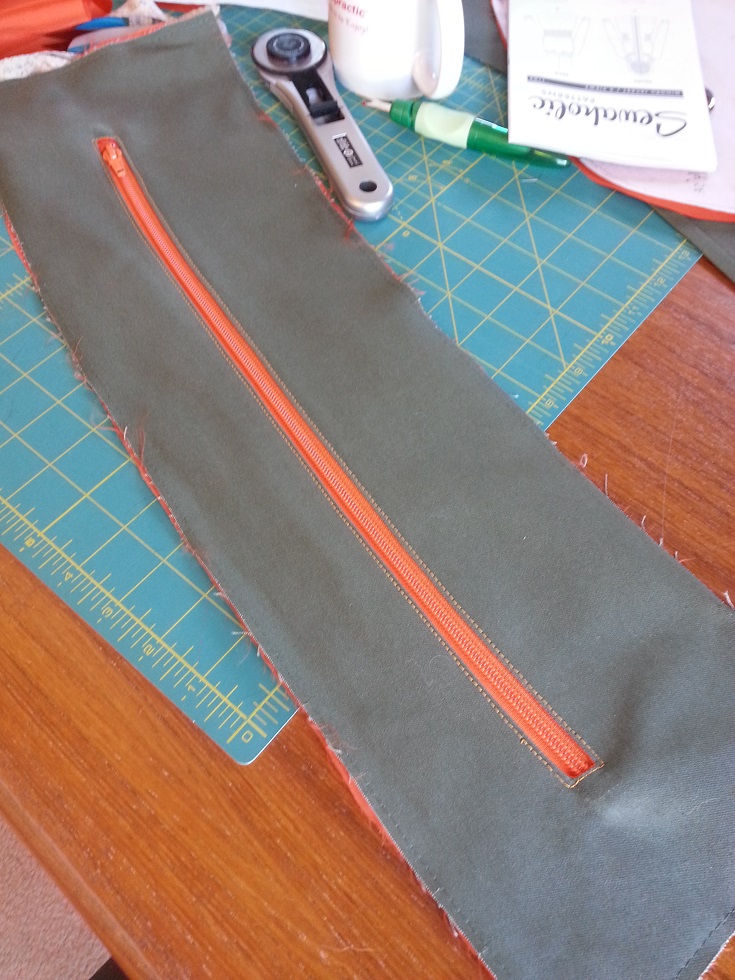
I used orange #5 molded plastic zippers for front and exterior pocket, and nylon coil zipper for the hood. I erroneously ordered a separating zipper for the hood, which I did not realize until I had already made the zipper opening. So I had to add some scrap lining to cover the end of the zipper.
I also used orange top stitching thread for top stitching. Maybe I should call this MA-1 Minoru.
For the inner pocket, I just used 1 pocket on the inside left front bodice only. I added pieces of scrap twill on the wrong side of the lining where pocket corners attached. Hopefully the lining won't rip. Since I don't see myself using this pocket so I'm not too worried. I did lengthen the pocket by 1". The pattern pocket looked too small.
The major issue as so many people had already said about this great pattern is that it does not come with exterior pockets. A jacket must have exterior pockets! So I eyeballed the pocket placement and used the lining fabric for the pocket bag. Glad that I had just watched Janet Pray's Craftsy class and saw how the zippered pocket is done. Though this was my very first zippered pocket for a garment, basically it was the same as the zipper on the collar or zipper on a purse. My top stitching around the zipper was a bit wonky, but I am immensely proud of my zippered pockets.
The other change I made was the hood. Since I read the reviewers saying the hood is really big and pointy, I cut the size 0 hood, then I reduced the hood pattern by 2". I then cut a 4" (plus seam allowance) strip to make a 3-piece hood. The fit of the hood is pretty darn good.
The sleeves were bit on the tight side to wear over a sweat shirt so I let out 1/4" or so. The fabric shows the perforation from the previous stitch line but hopefully nobody will look at the underarm seams so closely.
I like the elastic on the back bodice. No need for swayback adjustment.

The other thing I did was to add a second collar lining. I read many people disappointed at raw seam showing where the collar/hood piece attaches to the back bodice when the collar is out. I followed the instruction of Spiffy Stitches blog to remedy.

I'm still on the edge whether I should have interfaced the collar piece or not. The twill is hardy enough that it stays upright even when the hood is not zipped in, but I don't know...

The jacket is definitely a casual weekender type jacket and it's not meant for a full-fledged winter jacket. I considered using flannel for lining or interlining to make it warmer but I'm glad I did not for the size I cut. If I were to winterize this jacket, I will have to go up a size or two. But for the desert winter, this jacket will do.

There are some wonky top stitching and skipped stitches if you look closely, but I am very very very happy with and excited about this jacket. My very first jacket and the most complicated garment I have ever made and I will call it proudly a huge success.

December 11, 2015

New Patterns Purchased

感謝祭後のセールで、型紙がひとつ1ドルというセールがあって、新しい型紙10個も買っちゃった。こんなに作る暇もないし、すでに沢山まだ作ってない型紙あるのに。でも1ドルという値段には勝てず。
I bought 10 new patterns when Simplicity patterns were on sale for $1 each at the Black Friday sale.

At my snail's pace sewing, I don't need these many new patterns and I already have a stash of patterns I haven't even considered making. But it was a dollar each. I just could not pass.

Now that I have sewn a handful of garments, I have to say that these "Big 4" patterns are so economical. They are typically sold for $2 each on sale at Joann, and most of the patterns come with loads of variations. Many even come with ensemble of whole outfit with shirt, jacket, and pants.

I love indie patterns because they do a better job with sew-alongs and better instructions and modern package designs, but they are so expensive and you only get one garment out of each patterns.

My goal is to acquire basic patterns for each type of garment and reuse patterns I have in the future. After all, even with the exact same pattern, the garment will look completely different with different kind of fabric and different print. Hopefully in the future, I will be able to manipulate the patterns more, too, to add design element or to change style lines.

Anyway, that's my excuse to buy 10 new patterns. Look, they are all very basic, perfect to build wardrobe staples.

December 10, 2015

Green Minoru Jacket Day 10: Waist Elastic

ミノルジャケット制作10日目。
後ろ身ごろのウェストにゴムが入りました。
あとは裾の始末で完成です!週末には出来上がるかな。
My Minoru Jacket project day 10. Pressed and top-stitched where I joined the lining, and inserted the elastic to the back bodice.
The only thing left is the hem. I am thinking I can finish this by the weekend.

December 7, 2015

Green Minoru Jacket Day 9: Attaching Lining

ミノルジャケット制作9日目。裏地と表地が合体してきました。
アイロンかけるのも待てずに試着。もう興奮して鼻から熱い息が出てきます。
My Minoru jacket project day 9. Finally the lining is attached to the main fabric.
I cannot contain myself at this point. Could not even wait for pressing. So excited.

December 6, 2015

KonMari Method of Tidying Up

私は最近知ったんだけど、片付けコンサルタント近藤麻理恵さんはものすごく有名なのね?
こちらでも「コンマリメソッド」はものすごくはやってる。
彼女の本、「人生がときめく片付けの魔法」の英訳版を3ヶ月待ちでやっと図書館から借りられました。
収納方法を極めるのでなく、収納する前にいらないものをばっさり除外してしまうというのが素晴らしい。

所有物を一つ一つ手にとって、その物によって心ときめくかどうかでキープするか捨てるかを決めるっていうの、すごくいい。

コンマリメソッドで人生が変わるっていうの、わかるわ。なんていうか、ただの整理整頓じゃなくて、整理整頓を通じて、人生の無駄なものを省く方法を訓練する感じ。決断力を養うというか。

週末はちょっと頑張って所有物の点検しよう。
ちなみにこちらでは物を必要以上に溜め込む人が多いです。そんな人を紹介するテレビ番組がいくつもあるぐらい。
After 3 months of waiting, I finally got "The Life-Changing Magic of Tidying Up" by Marie Kondo from the library. (By the way, the correct pronunciation of her first name is "ma-ree-eh", not "ma-ree" as in Marie Antoinette)

I don't know if it was the original writing or the translation, but I had to overcome with the somewhat juvenile writing style at the beginning. Once she started more in detail of her method, then it became easier to read (still, the writing is not great unfortunately).

The main and the most important part of the KonMari method is to purge items that do not spark joy. She emphasizes that you should not even think about how to organize until you have completed purging. It totally makes sense. The culprit of clutter is simply too much stuff. In order to de-clutter, you need to purge.

What is revolutionary about this method is that it strengthen your decision making ability. You go through every single item of your belongings and ask yourself "does it spark joy" and decide whether to keep or purge. What's left is only the thing you either must keep (like some important documents) or things you truly cherish and love to possess. Nothing else. This approach is so transferable to life in general and by going through her method, I can totally see a person more focused on what's important to that person in life.

I love watching Hoarders and Buried Alive shows. Not that I "love" watching those people, but extreme hoarding is a very interesting phenomenon. The hoarding or extreme clutter is a phenotype of one's mind. The KonMari method really links the being psychologically balanced state and clutter.

I have to mention that it is extremely difficult to declutter house in Japan. One, the house is much smaller and many times multi-generation family lives in a small house so there are naturally too much stuff in a small house. But two, not like in the U.S. where you get a ginormous trash can that you can fit a cow in it, most municipalities in Japan require you to purchase garbage bags (which is only slightly bigger than a grocery bag most of the time unless you pay more for the bigger bag) and you have to sort trash into minute categories like flammable, cans, plastic bottles, etc. I tried to throw away a lot of my old stuff that my parents still kept in boxes last time I was there, but it was just too much to deal with the garbage. Yard sale is not common either.

Anyway, the book. The contents of the book can probably be reduced to a third if I were the editor, to be honest. But the KonMari method definitely has very revolutionary (yet simple and solid) way of de-cluttering. Now I have to go through my stuff and purge.

December 5, 2015

Green Minoru Jacket Day 8: End is Near

ミノルジャケット制作8日目。かなり進歩しました。
まずは裏地をつけた襟にファスナーをつけ
 できた襟にやっぱり裏地をつけた帽子を仮縫い。
ファスナーつきのポケットを前身ごろにつけて襟もつけてちょっと着てみた。あれ、ジャケットの緑とお風呂場の壁の色が同じ?
自分で言うのもなんだが、ちょっと出来上がり具合に感動している(笑)
完成間近、乞うご期待!
Now that the lining has arrived for my Minoru jacket, I was able to make a big progress.

The zipper has been inserted in the collar piece, the hood has been lined and attached to the collar piece, the inside little pocket is attached to the lining with velcro, lining has been constructed with a hanging loop, the exterior pockets with zippers have been attached, the collar piece is then attached to the bodice.

I am very excited. I am so glad that I added the zippered exterior pockets. I even french-seamed the pocket lining, without instruction. Although the top-stitching around the zipper was, well, less than perfect, I am very impressed at myself.

The remaining task is to attach the front placket and front zipper, then attach the lining. The end is near.

December 4, 2015

Green Minoru Jacket Day 7: Collar

ミノルジャケット制作7日目。
配達を待っていたジャケットの裏地が届いたので、やっとちょっぴり進展。
裏地を洗って、アイロンかけて、型紙にあわせて切って、と目に見えない作業が多く、縫ったのは襟ひとつだけ。ちなみにこの細い穴にはファスナーがつきます。(帽子が出てくるところ)
ジャケットが出来上がるころには春になってしまうんじゃないだろうか。
My Minoru Jacket project day 7.
The lining fabric has finally arrived so I was able to wash it, iron it, and cut it. The only thing I was able to sew was one of the collars for the zipper opening.
I hope I can finish the jacket before the weather starts warming up.

December 1, 2015

100 Lemons

レモンを収穫しました。100個採れました。

November 30, 2015

Weekend with Dogs

週末に犬を山に散歩に連れて行きました。ハイエナ?
Hyena?
帰ってきたらライチはお疲れモード。ソファの背もたれの上で寝るライチは猫か?
Cat?


November 29, 2015

Green Minoru Jacket Day 6: Cuffs

ミノルジャケット制作6日目。残りの材料が届くまでほかに縫えるところがないので、袖口の始末だけ。
袖口にはゴムが入っています。
袖を縫った後で袖がきつめなのに気づいて縫い代を出したんだけど、一度縫った跡が微妙に見えてしまうんだな。
My Minoru Jacket project day 6 was cuffs. That's the only place left for me to sew until I get the lining.
The cuffs have 2" elastic in it and gathers. I topstitched it though the instruction did not call for it.
The issue here is... I sewed the sleeves and realized that the sleeves were rather tight. I let out the seam allowance and it shows on the fabric. Oh well. It's tolerable.

November 28, 2015

Green Minoru Jacket Day 5: Finally Sewing

ミノルジャケット制作5日目。やっと縫製作業にたどり着きました。
でもまだ材料が全部届いていないので縫えるところが少なくて残念。
ちなみにこんなジャケットを作っています。左側の帽子つきバージョンを作っています。
My Minoru Jacket day 5. Finally sewing has started.
I am using a contrasting orange thread on a green fabric for topstitching. Call me a challenger.
With my fancy sewing machine's blind hem foot and the changeable needle position, edgestitching was very easy and fast. I am admiring my own work.
The pattern called for topstitching the side seam from hem to underarm but I did it all the way to the sleeves. It was tight in the sleeve, but the blind hem foot that has a ledge in the middle (thus works as a stitch in a ditch foot) really helped me.
Now I will have to wait for my lining to be delivered.

November 27, 2015

Green Minoru Jacket Day 3 & 4: Cutting Patterns

ミノルジャケット制作3日目、4日目は二日がかりで型紙切り。
ここでジャケットについてくる帽子の型紙をちょっと変えて、赤ずきんちゃんな2枚はぎの帽子を中心部がフラットな3枚はぎの帽子に変更。
外側のラインが元の型紙のラインで、一回り小さいのが変更後の線。
このジャケットにはポケットがついていないので、ファスナーつきのポケットをつけることにしました。
ファスナーつきのポケットなんて作ったことも無いのに、大丈夫かな、あたし。
I spent 2 days cutting the patterns for my Minoru jacket.

I decided to change the hood pattern after reading other people's reviews. Instead of a two-piece hood, I am going to add a 4 inch strip of long piece in between the hood patterns (that is cut 2 inches smaller) and will make a 3-piece hood.

I have never sewn a hood before, but I don't think this type of change will be a big deal to sew, hopefully.

Also, I decided to add zippered pockets to the exterior of the jacket, since the pattern does not come with exterior pockets.
I am just eye-balling the placement and size of the pocket. I wanted to make a pocket big enough to fit my phone (which is almost the size of a small Kindle with bulky Otterbox Defender).

Again, I have never sewn a zippered pockets before, but I have seen Janet Pray do it in her Craftsy course, so I can watch that again.

November 26, 2015

4-Day Weekend

木曜が感謝祭の祝日で、金曜も有給を取ったので4連休です。イェイ。
ちなみにオットは年末の有給消化運動中で10連休です。結局家で仕事してるってぶつぶつ言ってるけど、10連休には変わりなし。いいなぁ。
朝みっちり1時間犬の散歩をしたのであとは一日ぐうたら三昧。
スーパーに買い物に行ったら、クマ君が血圧計ってました。私も時々この血圧計測機活用してます。
Happy Thanksgiving. I have taken a day off on Friday so it is a 4-day weekend. Yippee.
The Man of the House is in a 10-day weekend, trying to use up his PTOs before the end of the year. Must be nice.

I already walked the dogs in the morning for a solid hour so I can have a guilt-free lazy day off. Thanksgiving dinner? We bought a Papa Murphy's pizza yesterday so I am covered.


November 24, 2015

Green Minoru Jacket Day 2: Tracing the Patterns

ミノルジャケット作成2日目。
アイロンをかけた型紙を写す作業です。わざわざ写さなくても、買った型紙を切ってしまえばこの工程は省けるんだけど、型紙を保存するためにちょっと面倒でも写します。
My Minoru Jacket day 2 is all about tracing the patterns.
Yup, that's how slow I am.

November 23, 2015

How to Add a Zipper to Your Pant Leg

ファスナーを取り付けたズボンをいたく気に入られて、もう2本頼まれました。
ギプスした足、ちゃんとズボンに入ったようだ。
さすがに2度目は要領もわかってポッドキャストを聞きながら作業する余裕もあり。

作り方:
1.ズボンのひざあたりにしるしをつける。(黄色い仕付け糸)
Mark the knee (the yellow thread) and sew the seam 1" above it to reinforce.
 2.裾からひざのしるしまで縫い代に両面テープをつける。(ちなみに裁縫用の水に流れるりゃんめんテープです。)
Add washable double sided tape on the seam allowance.
 3.両面テープを利用してファスナーを縫い代に貼り付ける。(待ち針を使うのが面倒くさいだけ)
Paste the zipper onto the seam allowance.
 4.縫い目をひざのしるしまでほどく。
Rip the seam open until the knee mark.
 5.ファスナーを縫い付ける。
Sew the invisible zipper on the seam allowance.
 6.手縫いでほぐしたぶんの裾をあげなおす。
Handstitch the hem.
 7.完成。
Done.
 もう1本も同じ要領で。
My "client" approved the zippered pant leg I did for his pants so I got 2 more pairs.
The first time, I opened the seam then basted it back shut. This time, I eliminated the basting process and started from the sewed seam. Yup, much easier. I was even able to work on it while listening to podcasts.

It feels good to be able to use my meager skill for someone in need.
Now I have to go back to my own Minoru project.

November 22, 2015

Still Going

もう終了かと思っていた花壇畑、まだ結構育ってた。
しし唐、プチトマト、唐辛子。
Shishito peppers, cayenne peppers, and wild cherry tomatoes.

November 21, 2015

Zippered Pant Leg

足の怪我をしてギプス姿になった人に頼まれて、ズボンの裾にファスナーを取り付けました。
足の内側の縫い目をひざまでほどいて、コンシールファスナーを縫いつけ、裾を上げなおして終了。
ファスナーを開けるとこんなかんじ。
急ぎ仕事だったので、家にあったファスナーを使ったので黒パンツに紺のファスナーだけど、コンシールファスナーだからファスナー締めたら見えないので気にしない。
プルタブが青いけど、その辺は見逃してもらおう。
I was asked to put a zipper in a pant leg by the Man of the House's co-worker. He injured his leg and his left leg is now in a cast. This is the same person who asked me to combine a red and blue T-shirts into one.

I ripped the inseam open to the knee, and sewed an invisible zipper in.
I did it in a hurry so I just used a navy blue zipper that I had at the house for black pants. Since it's an invisible zipper, the zipper won't show anyway other than the pull tab, so that's OK for my standard. My "client" wouldn't even care.
(But I seriously did consider painting the tab with black Sharpie...)

Hindsight, I probably should have added a strip of interfacing at the zipper opening for this rayon/poly fabric. My seam got a bit wavy.
This was the first time using the zipper foot that came with my fancy sewing machine, and I have to tell you, I do not like this zipper foot. It is just too wide!

I prefer the zipper foot for my Kenmore, the one that looks like a ski. Janet Pray also says that's the better type of zipper foot in her Craftsy course by the way.
My dislike of this zipper foot is not because I'm not using a designated invisible zipper foot. I had an invisible zipper foot for my Kenmore and I preferred my ski-like zipper foot for sewing an invisible zipper or any zipper for that matter. (I don't think invisible zipper foot is any better than regular zipper foot.)

We shall see if my "client" will approve the result. My concern is that his casted leg may not simply fit in the pant leg... Well, if it doesn't, I can still rip off the zipper and sew the pant leg back together and reclaim my invisible zipper (that I bought for a dress I was going to make).