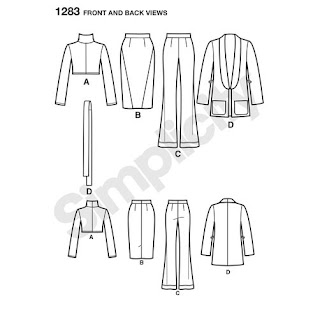
Pages

October 29, 2017

Simplicity 1283 Mimi G Knit Pants

ニット生地で、パンツを作ってみました。
型紙はシンプリシティの1283番
先週?作ったタートルネックシャツと一緒の型紙です。っていうか、タートルネック着てるし。タートルネックの上に重ね着してるのは、ちょっと前に作ったカットソーです。あら、そしたら全身自作服コーデですね。
生地はレーヨン/ポリエステルブレンドのポンテ・ローマ(ポンチ?)。犬の毛が超つくんだけど。
前身ごろのお股部分と後ろ身頃の太もも周辺のフィットがまだまだ発展途上。
ちなみにもう暗くなるのが早くて屋内写真となったので、黒いパンツが見えやすいように写真の露出最大限にあげています。


I thought I had a late start this morning, but fortunately, the day light saving time ended and I had an extra hour! So I got on sewing and made knit pants today.

The pattern is, again, Simplicity 1283, Mimi G design pattern. I made View C, which is the knit pants.

I used poly/viscose/spandex ponte. The fabric is jet black. I have increased the exposure on these photos to see the wrinkles.


I cut size 12. In order to fit my non-existing waist and ever so protruding belly, I eliminated the front darts, which add 2" to the waist circumference.

Also, I am short (5'3") and short-legged on top of that, and I don't wear high-heels, so the legs were obviously too long for me. I raised the knee by 3".


The pants are a bit too high-waisted for me, so I shortened above crotch by 1.5". I also did a low butt adjustment by scooping the crotch curve deeper. Here is the photo showing the original seam and my low butt adjustment. (I used my cover stitch machine's chain stitching to test the fit so it's easier to remove the stitches)


The pattern calls for a back zipper and hook & eye at the waist band. I eliminated them both, and put a 1.25" elastic in the waist band. That makes these pants essentially yoga pants! But hopefully they look nice enough to wear it in public as regular pants.


As you can see, there is still a lot of wrinkles both front and back, but for now, I'm happy with it.

PS: I am wearing my turtle neck shirt that I made last week, and my Simplicity 1805 kimono sleeve shirt. So, yeah, my outfit is entirely me-made!

PPS: The Man of the House asked me what I was wearing, after looking at me wearing what I was wearing, meaning he does not approve my outfit. I told him I was going for an art teacher look. He then said I look like Barb, from Stranger Things, meaning I look like I'm from the 80's. (He just binge watched the Season 2) Well, then I guess I'm going for the art teacher from the 80's look.

October 22, 2017

Turtle Neck! Simplicity 1283

すっかり寒くなってきました。毎日レッグウォーマー履いています。
10年も砂漠に住んでいたので冬に重ね着できる服があまりないことに気づきました。
なのでタートルネックロンT作成。
生地はモダールと絹の混紡ニット。見た目シンプルだけど、触った感じが非常にスムーズで、着るには高級感たっぷりな生地です。
型紙はシンプリシティというブランドの1283番です。
基本的に、ババシャツとして着たかったのでかさばらないように体にフィットな感じ。かなりお腹引っ込目で写真撮影。
生地の値段が高かったので、1メートルで出来上がってよかった。


Having lived in the desert for a decade, I lack garments that I can layer. Now that the weather in England is getting chiller every day, I needed some thermal under-layer shirt. So I made a turtle neck shirt.

The fabric is a modal 85% silk 15 % jersey. I only bought 1 meter because it was pricey. I made a toile using rayon jersey so I could address all the adjustment before I get to the modal/silk. I'm glad I did.

The pattern is Simplicity 1283. It's a Mimi G Style pattern. The pattern envelope comes with a variety of garment (top, skirt, pants, jacket). I made a view A, which is a knit top.


The original pattern is a cropped top, but obviously, I wouldn't want to show my midriff so it's a boring, basic, no frills shirt.


The pattern has CF and CB seam so that you can make a chevron with stripe fabric. I eliminated the CF/CB seam.

To make a full length shirt, I lengthened the pattern by about 9" at the hem. I needed 8" originally, but I shortened above the bust by 1" so I added that back at the hem.


The top is a typical Mimi G Style, I believe, with negative ease. This is my first Mimi G design, but having followed her blog for many years, I think she always makes figure hugging knit garment with negative ease.

Sleeves, however, were surprisingly loose and it had a low armhole. In order to raise the armhole, I shortened the bodice 1" horizontally above bust. I also took in 1" horizontally at the sleeve cap to match the shortened armscye. I then narrowed the sleeves by shaving off 1" from each side. I like how the sleeve fit but the cuff width is too narrow after the adjustment that if I want to pull my sleeve up, it only goes up half way up on my forearm. So next time, I will need to re-draw the sleeve to add maybe 1/2" or so below elbow.

The other thing about the sleeve is that they are pretty long. I personally love long sleeves and my toile sleeves scrunches up and I really like it. However, this shirt is intended to be an under-layer so I wanted the sleeves to be long but not too long. I shortened it by 2".


The original pattern has a high neck collar and zips up from the top part of center back all the way through the collar. Since I eliminated the center back seam, I eliminated the zipper as well. My jersey fabric wasn't stable enough to stand up on its own and my toile collar looked sloppy.

To address that, I doubled up the collar height so it can be worn crunched up or it can be folded over to be a proper turtle neck. Either way, my neck stays nice and warm.

I narrowed the shoulder by 3/8", and also changed the shoulder slope (lower the high neck point). The bottom photo shows how my pattern looks after the adjustment compared to the original size 12. (The traced pattern says 3/8" seam allowance but the photo was taken before I trimmed the seam allowance.)


Luckily, all the pattern pieces fit in 1 meter of fabric. Yey!
I really like how the shirt turned out and it's really nice to wear. I hope this modal/silk jersey will survive with regular laundry cycle...

October 9, 2017

Dog Crate Covers

去年、イギリスへの犬の空輸のために犬小屋の中にしくマットを作りました。
ちゃちゃっと作ってしまったのでかわいくないし、この蝶柄のフランネル、蝶々の青いインクが洗濯のたびににじみ出て、1年もたたないのにみったくない姿になってしまいました。
なので新潮。
Old crate mat cover I made last year.
New cover!
When air-shipping the dogs became inevitable last year, I hastily made a dog crate mat using 2" thick high density foam and butterfly printed flannel. The blue dye on the butterfly bled out and the cover has become sad looking less than one year.

So I decided to make a new one. Well, 2, obviously. The main fabric is cotton/poly blend upholstery fabric. It was pricey (about $22 per meter), but it is really nice and thick, but soft to touch.


I lined the cover with Ripstop so that the water does not get to the foam easily. The foam itself is also covered with old sheet to make it easier to put it in and out of the cover.


This is actually perfect for a bench seat cushion...


I used duck canvas for the bottom.


Crate mat in action.


October 4, 2017

Day Out in London

パスポートの更新のため、ロンドンの日本大使館まで行ってきました。平日のロンドンは週末とは違ってとても静かでした。

I had to renew my passport and visited Japan Embassy in London today. London in weekday was much quieter than the London I know in weekend.

ロンドンへの旅の第一歩は最寄りの駅ちかくの駐車場。駐車料金は4時間で2.7ポンド(約400円)。

The first step to London: pay for the parking near the station. 2.7 pound (about $3.50) for 4 hours.
電車でロンドンへ。

Taking a train to London.
電車から地下鉄に乗り換え。

Changing to Tube.
どれが大使館かわかるかな、とちょっと心配だったけど、旗たっててわかりやすかった。

Japan Embassy.

パスポート更新の申請事体は、待ち時間もなく、1時間かけてここまできたのに、

5分もかからずに終わってある意味がっかり?

There was not even a waiting line and the whole process took less than 5 minutes.
イギリスの電話ボックスはまだ赤いです。っていうか、電話ボックスがまだあること自体がびっくり。バスも2階建てだし。

Yup, they still have a red phone box.
オットとロンドンに来るときにはできないことをしようと思って、布が有名なリバティというお店に行ってきました。

Pilgrimage? to Liberty of London.
 せっかく行ったのに何も買わずに帰ってきたけどね。

Ended up buying nothing though.
 ピカデリーサーカスに向かう道。カーブしてる道に沿って建物もカーブしています。

The street leading to Piccadilly Circus. The curved buildings along the curved street are very interesting.
 チャイナタウンのパン屋さんでお土産購入。

Bakery at China Town.
チャイナタウンではどのパン屋さんでもたい焼き売ってるよ。アンパンとソーセージパンとカレーパンと肉マンパンを買ってきました。お昼ご飯に食べました。

All the China Town bakeries sell taiyaki (fish shaped, red been paste filled sweet).