Pages

October 29, 2019

Dropped Shoulder Sweater: Simplicity 8738

やっと秋らしく涼しくなりました。でも涼しくなったと思ったらもう急に寒くなったので、あったかめの服を作りました。
布は去年ロンドンで買った、編み物柄にキルトされてるニットです。


Once the autumn hit my area, it got really cold all of a sudden so I'm in a full winter sewing mode. Funny I actually just made four Sewaholic Renfrew shirts before this project (unblogged), two of which were short sleeve T-shirts.


The pattern is Simplicity 8738. I made a view B, tunic length, turtle neck.


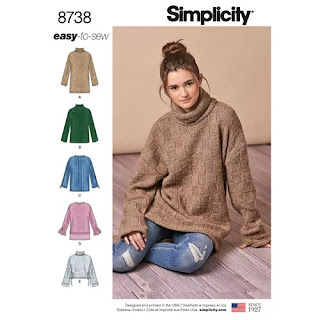
The fabric is a poly/rayon blend quilted knit that I bought at Knitting and Stitching Show in London last year. I actually saw this knit on YouTube and had been checking on Higgs & Higgs website for like a year (fabric was pricier in general in England) but then at Knitting Stitching Show, my wallet was kinda loose.


I measured my men's hoodie I happened to be wearing and by comparing it to the finished measurement of the pattern, I decided to cut a size XS. I shortened the bodice by 2" and shortened the sleeves by 2".

Then came the neck band (the turtle neck). I sewed the ends together to a make a tube, folded in half, and it looked, you know, extra small, as the pattern size may suggest. And it did not even go over my forehead. I am short, but I am known to have a big head, both figuratively and literally.

Of course I did not check the stretch gauge on the envelope before I started the project. It's an oversize sweater so I didn't even think about stretch percentage.


I re-cut the neck band for size XXL (yes, my head is that big), and also re-cut the bodice neck line for XXL to match.


I like it, but I think I did not do justice to both the fabric and the pattern. I think I need to go up a size to Small, which is what the pattern suggests for my body measurements. I know it sounds funny to go up a size when there is already so much ease. But I think the sleeve/shoulder junction needs to drop down a little further, and just a bit more ease to make it look intentionally oversized.

And I think this quilted knit was too stable for this pattern. I originally earmarked this fabric for Jalie 2795 (zip front jacket). The fabric is great (though it does feel very polyester) but it just does not have the drape. A Jalie jacket would have been a better pattern for the fabric. This is totally my fabric/pattern matching error. But that's what happens when the weather gets cold and I want a big cozy turtleneck.

I will come back to this pattern again when I find a nice chunky sweater knit.

October 25, 2019

Sewing a Shift Boot with My New Juki

中古のミシンを買いました。メイドインジャパン。実はこれ、オットからの3年遅れのクリスマス・結婚記念日祝い。
新しい(中古だけど)ミシンでのプロジェクト第一号は、オットの車のシフトブーツ。
現存のシフトブーツはもうボロボロどころか、触るだけで表面のビニールがポロポロはげ落ちてくる状態でした。
皮で作って、って頼まれたんだけど、とりあえず練習用にビニール布で作ってみました。
初めて作った割にはけっこう完ぺき。自画自賛。練習用と言わず、もうこれで完成。


I bought a second-hand industrial Juki. It's actually a wedding anniversary & Christmas gift from the Man of the House that was promised to me 3 years ago.


The first project with my industrial Juki is a new shift boot for MOTH's car. The current one is in a pretty poor condition: disintegrating badly and the vinyl was falling apart as you touched it.


I had never made a shift boot before, but after watching some YouTube tutorials, it looked pretty simple. (And it indeed is.)

1. Take it apart and trace the shape of the panel.


2. Add a seam allowance.


3. Cut the vinyl. MOTH wanted a leather boot but I wanted a prototype to practice so I bought some fleece backed vinyl. My boot had 4 panels and they were all different shape. I numbered them so I would know how the panels fit.


4. Sew the panels together and top stitch. Oh, my, god. Compound feed industrial machine is amazing. So, so amazing.


Tada~.


I was a bit worried that the shape of the base was not quite a symmetrical trapezoid, but that was how the frame piece was shaped. Phew. The boot actually fit perfectly.


This was supposed to be a practice run, but I think this is it, unless MOTH decides he really wants a leather boot. It was only 4 seams to sew and topstitch, but it feels like quite an accomplishment. LOVE IT!


October 19, 2019

Organizing Embroidery Thread

義母から、ヤードセール(個人宅の前庭で行われる不用品処理セール)で買った箱いっぱいの刺繍用糸を譲り受けました。

プラスチックの箱や紙製糸巻きの変色具合から見て、20年から30年前ぐらいの糸かしら。多分年老いた奥さんの趣味だったんだろうね、かなり色がそろってるもの。
まだ房状態のものは糸巻きに巻き直したり、私がもともと持っていたものと合わせて色番号ごとに分け直し、色番号の順番で箱に入れなおしました。

実は日本に里帰りしてた時、「刺繍の基本」という本を買ったばかりだったので、グッドタイミング。すぐ刺繍に取り掛かるわけではないけど、これだけ色がそろってればやりたいときにすぐできるかな。


I was given a Banker box full of embroidery thread from my mother-in-law that she bought at a yard sale.


I have done a few cross-stitching before but not a full-on free-hand embroidery. I actually bought an embroidery book while I was in Japan, so it was a perfect timing.


Looking at the discoloration of the plastic box and the paper bobbin, I'm thinking these threads are probably 20 to 30 years old. But the lady (assuming it was a lady looking at the hand writing on the bobbins) had quite a range of color so with the ones I already had from my stash, I ticked off a good amount of colors available on the DMC color chart.


Now they are all organized. With this range of color, I can pretty much start any embroidery project without going to a store.


October 17, 2019

Aveiro Cardi #2

日本に行く用に作って、日本で着て、アメリカに帰ってきたらすでに暑くて着れなかったカーディガンがやっと着れるぐらい涼しくなりました。
前にも使ったカーディガンの型紙のちょっと長いバージョン。
金沢で、1000円もする金箔ソフトクリームと記念撮影。


I made a cardigan back in May. I made it for my Japan trip and wore it in Japan. When I returned to the Deep South, however, the weather was too sweaty hot to wear a cardi so it has sat in my closet. Now that the weather has gotten chilly, I can finally wear it again. (By the way, I am holding a $10 soft serve ice cream with gold leaf in the picture above.)


The pattern is Aveiro Cardigan from Itch to Stitch. I made a short version before. The short version is definitely a good length to wear over a dress, but I wanted a regular length to wear with my jeans so this time, it's a regular length bodice with 3/4 sleeves.


The fabric is a needle out sweater knit (bought in 2013!). It's a poly-Spandex blend, but it also has metal thread knitted in there that gives a bit of a sparkle through the "holes" in the fabric.


I cut a size 4 this time, and did a few modifications:

  • Square shoulder adjustment - raised the shoulder point 1/2".
  • Omitted cuff band - just turn the seam allowance under and coverstitched.
  • Lengthened the bodice at the hem by 2.5", then halved the height of the hem band for a more traditional cardi look.
  • Like I did last time, I just cut one continuous neck band, instead of piecing front and back neck band together.


As with any knit tops, I get the wrinkle above my bust. Do I need to shorten the bodice above bust? Then I have to adjust the front sleeve curve, too, right? I'm too lazy for that.


I needed to stabilize the neck band/front packet for the button holes. But because of the "holes," I could not use a fusible interfacing. I thought about using some silk organza but I only had black in my stash and it did not look right. So at the end, I cut a bias strip of burgundy rayon lining and sandwiched it in the band.I think it worked.


I had just finished making my hobbit costume when I started this cardigan project, and the extra gold dome shaped buttons I used for Frodo's waistcoat was still on my sewing table. The buttons looked pretty good with the gold metal thread in the fabric so they went on this cardigan as well.

Worn together with my Ginger Jeans (long version, and capri version).

October 9, 2019

Safety First

日が暮れるのが早くなりました。
田舎住まいなので、家の周りに街灯が全くなく、犬の散歩が危険になるので、散歩用鞄(ウェストポーチだけど基本的にたすき掛け)のベルトに反射テープを付けました。見た目より、安全第一な中年主婦です。


The day light is getting shorter in my area. Since there is no street light on my walking route, I sewed a reflective tape on my dog walking bum bag belt. (I do carry a flash light too if it's dark) The bag carries poo bags, dog treats, cell phone and keys. I wear the bag cross-body style instead of around the waist, so the webbing does not get covered by clothing.


I picked the seams where the webbing was connected to...


...sewed the reflective tape on the webbing...


...then sewed the webbing back on.


 Bag in action.


October 7, 2019

Uvita Top and Bapron in Action

昨日まで日中は30度ぐらいだったのに、今日は雨降って20度。寒っ。
そんな季節の変わり目にちょっと袖の長いTシャツ。
型紙はItitch to Stitchというとこの無料ダウンロードな型紙です。
買い物に行った帰りではなく、持ってる袋の中身はこの前作った涎掛けだよ。義妹家族と昼ご飯食べに行くとこだったので涎掛けもっていって早速使いました。


I made a longer sleeve T-shirt for the transitioning weather. The pattern is Uvita Top from Itch to Stitch. It's a free download!


The main bodice fabric is a rayon jersey with 5% Lycra. The sleeves are Kaufman cotton jersey with 5% Lycra, left-over from MOTH's shirt I made 4 years ago.


I cut a size 2 mainly and flared out to size 4 at hip. I also shortened the bodice by 1". After it was sewn, the sleeves and upper bodice was a bit too loose so I took in about 3/4" from the entire length of the sleeve, then tapered to nothing from underarm to the waist notch. I like the end result but I keep pulling my sleeves up a bit, so next time I may just shorten the sleeves by a couple of inches.


(Worn together with my Ginger Jeans and Boronia Bowler bag.)

The reason why I was carrying a shopping bag in the above photos is because we were on the way to lunch with the sister-in-law family and I was bringing the Baprons I made the other day. Here is the Bapron in action:

(This is the default size.)


(And the 120% enlarged version.)

October 1, 2019

The Bapron Again

義妹のとこに3番目の子が産まれるので、1番目の子用に作った涎掛けがまた欲しいと頼まれました。そして2番目の子用にも、もうちょっと大きめの涎掛けが欲しいと頼まれました。
なので頑張って涎掛けたくさん作りました。全部で13個!大・中・小の3サイズで。
モデルはやっぱりファントム君で。(ちなみに彼は怖い顔してるけど、由緒正しきオペラ座の怪人の怪人なのよ。)


Mr. Phantom modeling the Bapron. By the way, he's from The Phantom of the Opera. He looks funny but he is classy. He carries a lantern in his right hand and the extended left hand used to have a mask. He was MOTH's childhood Halloween decoration and now he is my sewing buddy.

I made the Bapron 5 years ago when my American Nephew #1 was born. We are having the American Nephew #3 in a couple of months so I made new Baprons. Also, I was asked to make them a bit bigger for the American Nephew #2 (who uses the hand-me-down Bapron from AN#1), so I made 13 total in 3 sizes.


According to the printout footer, I printed the pattern in 2011. At the time it was a hand-drawn, one size only, free downloadable pattern. Now she sells it and the pattern comes in 2 sizes.


Since my pattern only came in one size, I printed the pattern at 110% and 120% to enlarge it.


One of the double gauze I bought for these bibs was advertised as Robert Kaufman but looking at the selvage, it is a Japanese double gauze. Robert Kaufman just distributes this fabric line so it was a slight false advertisement on Fabric.com. I actually used this fabric line, Sevenberry, for my dirndl and that selvage also said "Made by Japan." I really wonder if the made by Japan is intentional or not...


I used the double gauze for the front and Moda quilting cotton and Riley Blake flannel for the back.


Each bib uses about 2 yards of bias binding. I didn't want to make 30 yards of bias binding, so I opted for a fold-over elastic. So much easier!


Thirteen bibs completed. Phew.