海を越えて引っ越すにあたり、会社が負担してくれる空輸費用内に収めるため、最低限の荷物しか持ってきてないんだけど(家具何てもってのほかです)、引きこもり生活に備えてしっかりミシンは持ってきました。それもミシン、ロックミシン、カバーステッチミシン、と3台も。
空輸用に荷物を詰めたのはいいけど、実はイギリスで使えるかどうかちょっと心配だったのよ。電気の仕組みがちがうから。ボルト数と周波数が違うんだよね。(ちなみに東日本と西日本では周波数が違うって知ってた?)
そんなわけで、変圧器を使ってミシンが動くか、動いても内蔵のコンピューターとかモーターに支障が出ないか、ちょっと賭け。
でもちゃんと動いたわよ~。はぁ、よかった。
Because of the limited amount of personal belongings that we were able to ship to the UK within the shipping allowance, we brought bare minimum. However, I needed to bring my sewing machines because I knew I would be stuck at the house all day so needed something to do.
The only problem was that US and UK use different electricity setting, and you will need a voltage converter, in addition to the plug adapter. We did not bother to bring any electric appliances like hair dryer because it's cheaper to buy one over buying a converter for each appliance. (By the way, half of Japan uses 50Hz and the other half uses 60Hz, did you know that?)
So, I wasn't sure actually when I packed my sewing machines for shipping if I could really use my sewing machines using a converter. I still packed my sewing machine, serger, and a coverstitch machine...
Well, the answer is, they all worked!
So here is my set up. The transformer is plugged into the UK wall outlet. Then I have a US serge protector plugged into the transformer, so that I can keep multiple US plugs connected.
I made my shirt (working on buttons now) using both sewing machine and a serger, and they seem to work just fine. Hooray.
March 7, 2017
March 6, 2017
March Project: Butterick B5526
去年作ったディアンドルの残りの布を使って、シャツを作ってみようと思います。実はボタンダウンのシャツが一枚もないので。(ニットなカットソーばっかり着てるからさ)
襟のあるシャツなんて作るの初めてなのでちょっと心配。
型紙はバタリックの5526番。ライチにモデルになってもらいました。
My March project is (not that I have a monthly project list) Butterick B5526, a shirt.
I did not bring any button down shirt to UK (I live in knits) so hopefully I can make something wearable.
I will be using a left-over cotton shirting from my dirndl for a mock-up. I probably should use a muslin to make a mock-up so that I can do a proper fitting and transfer it back to the pattern but I don't have muslin and there is no JoAnn here so I will use what I have.
This is my very first proper button down shirt with a collar, so I am reviewing Janet Pray's shirt making class on Craftsy. She is a great teacher, by the way.
襟のあるシャツなんて作るの初めてなのでちょっと心配。
型紙はバタリックの5526番。ライチにモデルになってもらいました。
My March project is (not that I have a monthly project list) Butterick B5526, a shirt.
I did not bring any button down shirt to UK (I live in knits) so hopefully I can make something wearable.
I will be using a left-over cotton shirting from my dirndl for a mock-up. I probably should use a muslin to make a mock-up so that I can do a proper fitting and transfer it back to the pattern but I don't have muslin and there is no JoAnn here so I will use what I have.
This is my very first proper button down shirt with a collar, so I am reviewing Janet Pray's shirt making class on Craftsy. She is a great teacher, by the way.
February 28, 2017
WTF UK: Laundry in the Kitchen
イギリスでは、洗濯機が台所にあるのが普通。水回りを集めてるのはわかるけど、洗濯物と食事を作るところが一緒なのは私的に微妙。
ほこりが飛びそうだからご飯の用意をしてる時に乾燥機から洗濯物を取り出したりしたくないし、ご飯の用意をした後はカウンターをきれいにしておかないと、洗濯物を取り出してカウンターに置いたときにパン屑とかつくし。っていうか、洗濯物を台所のカウンターに置きたくないし。
洗濯機が見えないようにキャビネットにドアがついてるのはいいけど、キャビネット開けてまた洗濯機あけて、隣のキャビネットあけて乾燥機あけて、と開けるものが多くて面倒くさい。
It is common to have a washing machine under a kitchen counter here. I mean, I can understand it; it's easier to run the water/drain pipe in the kitchen but it is so inconvenient... Why can't they just put the washing machine in the bathroom instead, if the size of the house doesn't allow a separate laundry room? Or put it in the closet?
One, I don't want to take out the laundry from the dryer when the food is out (same reason why I don't vacuum when food is out), and two, I have to keep the kitchen counter free from bread crumbs and what not, otherwise clean laundry gets dirty (and I'm not the cleanest person in the world).
This house has this nice fancy cabinet doors that hide the washing machine and the dryer, but then I have to open door after door to move the laundry between the two.
I shouldn't complain. I was fortunate that this house came with a dryer. It appears the dryer is not that common in small houses and flats here. But I'm just saying, I don't like doing laundry in the kitchen.
ほこりが飛びそうだからご飯の用意をしてる時に乾燥機から洗濯物を取り出したりしたくないし、ご飯の用意をした後はカウンターをきれいにしておかないと、洗濯物を取り出してカウンターに置いたときにパン屑とかつくし。っていうか、洗濯物を台所のカウンターに置きたくないし。
洗濯機が見えないようにキャビネットにドアがついてるのはいいけど、キャビネット開けてまた洗濯機あけて、隣のキャビネットあけて乾燥機あけて、と開けるものが多くて面倒くさい。
It is common to have a washing machine under a kitchen counter here. I mean, I can understand it; it's easier to run the water/drain pipe in the kitchen but it is so inconvenient... Why can't they just put the washing machine in the bathroom instead, if the size of the house doesn't allow a separate laundry room? Or put it in the closet?
One, I don't want to take out the laundry from the dryer when the food is out (same reason why I don't vacuum when food is out), and two, I have to keep the kitchen counter free from bread crumbs and what not, otherwise clean laundry gets dirty (and I'm not the cleanest person in the world).
This house has this nice fancy cabinet doors that hide the washing machine and the dryer, but then I have to open door after door to move the laundry between the two.
I shouldn't complain. I was fortunate that this house came with a dryer. It appears the dryer is not that common in small houses and flats here. But I'm just saying, I don't like doing laundry in the kitchen.
February 26, 2017
Wellies
散歩時の泥対策として、長靴買いました。本当は赤地に白の水玉模様のがほしかったんだけど、いいのが見つからなかったので無地の赤で妥協。これで泥んこ道もオッケ。
(でもコートも赤いし、ユキのコートも赤いし、林家パー子さんの赤バージョンとなりつつある私)
In order to deal with the muddy walk, I bought a pair of Wellington boots. Now I feel like I'm legit in the English countryside. I originally searched for glossy red ones with white polka dots but could not find them so I compromised for a mat solid red. I need to go easy on red items in my clothing; otherwise I will soon become Parko Hayashiya (Japanese comedian who wears mainly pink for her stage costume).
(でもコートも赤いし、ユキのコートも赤いし、林家パー子さんの赤バージョンとなりつつある私)
In order to deal with the muddy walk, I bought a pair of Wellington boots. Now I feel like I'm legit in the English countryside. I originally searched for glossy red ones with white polka dots but could not find them so I compromised for a mat solid red. I need to go easy on red items in my clothing; otherwise I will soon become Parko Hayashiya (Japanese comedian who wears mainly pink for her stage costume).
February 25, 2017
Climacteric Year
オットは今年が厄年らしい。厄年に引っ越しとかしてよかったのかな。お母さんが地元の神社で厄除けしてくれたので大丈夫?早速オットは送ってもらったお守りを鞄につけていました。
My mother emailed me a couple of weeks ago saying that the Man of the House is in climacteric year this year. Japanese climacteric year is slightly different from the western equivalent (different years for men and women, you count yourself 1 year old when you are born, etc.), but the main thing is the same: it's supposedly your unlucky year. Great notion to have when we have made an epic move across the Atlantic.
My mother had a ceremony performed at a local shrine to drive away the ill luck for MOTH and mailed him a lucky charm. Let's hope it works.
My mother emailed me a couple of weeks ago saying that the Man of the House is in climacteric year this year. Japanese climacteric year is slightly different from the western equivalent (different years for men and women, you count yourself 1 year old when you are born, etc.), but the main thing is the same: it's supposedly your unlucky year. Great notion to have when we have made an epic move across the Atlantic.
My mother had a ceremony performed at a local shrine to drive away the ill luck for MOTH and mailed him a lucky charm. Let's hope it works.
February 22, 2017
Jalie 3461 Pull-On Jeans
大阪のおばちゃんパンツと同じ型紙で、デニムの生地を使ったパンツを作りました。スキニージーンズに見えるような、でも実はゴムウェストなステキなパンツ。
まだまだフィットに問題ありだけど、今の時点では満足。
Since I liked the pink zebra mock-up version, I made another pair of these pull-on jeans using a denim fabric. (Poor quality photo warning)
The pattern is the same Jalie 3461 Eleonore Pull-On Jeans pattern.
The fabric is stretch denim, 95% cotton, 5% Lycra. This fabric is stretchier than the pink zebra. I used the 1" elastic for the waist as the pattern called for.
This time, I cut a size T at waist/hip, tapered to size S at the knee, then used size P for length. I took off the 1/2" addition at the crotch that I did in my zebra version, but added 1/2" as full tummy. I may not have needed it...
This pair shows up the flaws in fitting more than the zebra version. I have extra fabric near my crotch, and my back legs are hot mess. But at this point of my fitting/alteration skill for pants, I am happy with this totally wearable pair.
I used the same fusha embroidery thread that I used for my zebra version for top stitching. Loving it.
In order to make the thread color pop out, I wound a bobbin with the same embroidery thread, and used the spool and the bobbin for the top stitch. It worked out very well.
Since my zebra version had a slight gaping at the back waist, I shortened the elastic for back waist by 1", and it worked. I also used my coverstitch machine's chain stitch (single needle) to attach the waist band so that it allows more stretch and stitches won't break when I pull the jeans on and off.
The back leg fitting issue aside, I would love to make a pedal pusher length pair for warmer season.
まだまだフィットに問題ありだけど、今の時点では満足。
Since I liked the pink zebra mock-up version, I made another pair of these pull-on jeans using a denim fabric. (Poor quality photo warning)
The pattern is the same Jalie 3461 Eleonore Pull-On Jeans pattern.
The fabric is stretch denim, 95% cotton, 5% Lycra. This fabric is stretchier than the pink zebra. I used the 1" elastic for the waist as the pattern called for.
This time, I cut a size T at waist/hip, tapered to size S at the knee, then used size P for length. I took off the 1/2" addition at the crotch that I did in my zebra version, but added 1/2" as full tummy. I may not have needed it...
This pair shows up the flaws in fitting more than the zebra version. I have extra fabric near my crotch, and my back legs are hot mess. But at this point of my fitting/alteration skill for pants, I am happy with this totally wearable pair.
I used the same fusha embroidery thread that I used for my zebra version for top stitching. Loving it.
In order to make the thread color pop out, I wound a bobbin with the same embroidery thread, and used the spool and the bobbin for the top stitch. It worked out very well.
Since my zebra version had a slight gaping at the back waist, I shortened the elastic for back waist by 1", and it worked. I also used my coverstitch machine's chain stitch (single needle) to attach the waist band so that it allows more stretch and stitches won't break when I pull the jeans on and off.
The back leg fitting issue aside, I would love to make a pedal pusher length pair for warmer season.
February 21, 2017
Dog Walking in the Countryside
田舎暮らしの犬の散歩は畑の中の道。景色抜群。馬やらガチョウの大群やらキジやらわんさか。住む場所を探すとき、ロンドン市内も候補に挙がってたんだけど、いや、やっぱり田舎にしてよかったわよ。
One thing I am so glad that we decided NOT to live in London is that I don't have to walk the dogs in the city. For the last 10 years, we were fortunate to have a designated bike/walk path behind our house (or even behind our apartment, which was on the same path) and we enjoyed walking in the desert. Now, we've got a walking path in the field.
Well, it's not a designated walking path, but it feels like it. It's a very narrow, single lane road, some parts are paved and some are not. Cars do go by but not that frequent in this village.
We first pass our neighbor Oscar.
Then pass by an old church.
Then the field.
More field.
Then a narrow cranking path. This is not a one way street, and it's on a hill. I would not want to think about backing up to let other car pass here...
At the end of the walk, my shoes and my jeans are spattered with mud, even when it's not raining (mud does not dry here). If I get spattered, well, dogs' underbellies are soaking wet with mud.
One thing I am so glad that we decided NOT to live in London is that I don't have to walk the dogs in the city. For the last 10 years, we were fortunate to have a designated bike/walk path behind our house (or even behind our apartment, which was on the same path) and we enjoyed walking in the desert. Now, we've got a walking path in the field.
Well, it's not a designated walking path, but it feels like it. It's a very narrow, single lane road, some parts are paved and some are not. Cars do go by but not that frequent in this village.
We first pass our neighbor Oscar.
Then pass by an old church.
Then the field.
More field.
Then a narrow cranking path. This is not a one way street, and it's on a hill. I would not want to think about backing up to let other car pass here...
At the end of the walk, my shoes and my jeans are spattered with mud, even when it's not raining (mud does not dry here). If I get spattered, well, dogs' underbellies are soaking wet with mud.
February 20, 2017
Pink Zebra Cosmetic Pouch
大阪のおばちゃんパンツを作った残りの布で、角型化粧ポーチを作りました。
クリスマスにあげるようにたくさん化粧ポーチを作ったけど、自分用ではなかったので、これは自分用。引っ越しのためにこまごましたものを入れるのにいいかな、と思ったの。
I made a couple of boxy cosmetic pouches using the left-over fabric from my Jalie Eleonore pants. I bought 1 1/2 yard of 49" fabric and only used 1 yard for the pants, so the left-over was nicely rectangular big piece of fabric.
Since I made bunch of cosmetic pouches over the Christmas but they were all give-aways, I wanted to keep these. They worked pretty well for keeping small items for moving/shipping. I just really love this pink zebra print (fusha/purply pink is more accurate to describe the color).
クリスマスにあげるようにたくさん化粧ポーチを作ったけど、自分用ではなかったので、これは自分用。引っ越しのためにこまごましたものを入れるのにいいかな、と思ったの。
I made a couple of boxy cosmetic pouches using the left-over fabric from my Jalie Eleonore pants. I bought 1 1/2 yard of 49" fabric and only used 1 yard for the pants, so the left-over was nicely rectangular big piece of fabric.
Since I made bunch of cosmetic pouches over the Christmas but they were all give-aways, I wanted to keep these. They worked pretty well for keeping small items for moving/shipping. I just really love this pink zebra print (fusha/purply pink is more accurate to describe the color).
February 19, 2017
Jalie 3461 Mock-up
引っ越す前に、大阪のおばちゃんパンツを作りました。赤紫なシマウマです。
私的には大好評なんだけど、オットには「絶対にそれ着て外出するなかれ」と命令されました。絶対にダメだそうです。
型紙はカナダの会社、Jalieの3461番、Eleonoreという型紙で、ウェストがゴムなパンツです。安売りしてた生地を使ってフィット感を試す試作品として作りました。
Pink zebra. Love it.
I made Jalie 3461, Eleoreore pull-on jeans while I was still in the U.S. This was an elastic waist, pull-on pants using a stretch cotton, has real back pockets, but the front pockets and the fly-front were just fake, top-stitch only.
I made the full length version and made a size T at waist, size S at hip, then R at length but shortened it further by 1 1/2"(because I am a 5"3' short-legged, rectangular, half-size). I also added 1/2" at the front crotch.
I used a stretch bottom-weight cotton that is 97% cotton, 3% Lycra. I bought 1.5 yard of this narrow 49" fabric, but with my sizing, I only needed a yard.
I loved the color so much that I used a coordinating color embroidery thread for all top-stitching. The top stitching is not obvious in this busy print, but the thread has a nice sheen and I like it.
The fit is OK. I think my crotch alteration was not necessary.
I added the back waist elastic as is (same length as the back yoke per the pattern instruction), but there is some gaping at the back waist, so the elastic needs to be shortened and sewed on stretched.
I made it as a mock-up, thinking that the fabric was only $2.99/yard, and after all, it's pink zebra. But I actually really like it. The issue is... the Man of The House ordered me not to wear it in public... He thinks it's old lady fashion.
But don't you worry, I have not lost hope. I did bring this pair all the way to U.K. so I will wear it at the house (I'm confined in the house anyway) and he'll get used to seeing it and won't say anything in the future... We shall see.
私的には大好評なんだけど、オットには「絶対にそれ着て外出するなかれ」と命令されました。絶対にダメだそうです。
型紙はカナダの会社、Jalieの3461番、Eleonoreという型紙で、ウェストがゴムなパンツです。安売りしてた生地を使ってフィット感を試す試作品として作りました。
Pink zebra. Love it.
I made Jalie 3461, Eleoreore pull-on jeans while I was still in the U.S. This was an elastic waist, pull-on pants using a stretch cotton, has real back pockets, but the front pockets and the fly-front were just fake, top-stitch only.
I made the full length version and made a size T at waist, size S at hip, then R at length but shortened it further by 1 1/2"(because I am a 5"3' short-legged, rectangular, half-size). I also added 1/2" at the front crotch.
I used a stretch bottom-weight cotton that is 97% cotton, 3% Lycra. I bought 1.5 yard of this narrow 49" fabric, but with my sizing, I only needed a yard.
I loved the color so much that I used a coordinating color embroidery thread for all top-stitching. The top stitching is not obvious in this busy print, but the thread has a nice sheen and I like it.
The fit is OK. I think my crotch alteration was not necessary.
I added the back waist elastic as is (same length as the back yoke per the pattern instruction), but there is some gaping at the back waist, so the elastic needs to be shortened and sewed on stretched.
I made it as a mock-up, thinking that the fabric was only $2.99/yard, and after all, it's pink zebra. But I actually really like it. The issue is... the Man of The House ordered me not to wear it in public... He thinks it's old lady fashion.
But don't you worry, I have not lost hope. I did bring this pair all the way to U.K. so I will wear it at the house (I'm confined in the house anyway) and he'll get used to seeing it and won't say anything in the future... We shall see.
February 13, 2017
Traveling to UK with Dogs
イギリスへの空の旅、犬編。直行便に乗るため、テキサス州のヒューストンまで車で移動だったので、夜通し15時間ドライブ。車の中で昼寝して、ご飯食べてトイレ行って、アパート出てから空港に着くまで22時間かかりました。
その上犬の飛行機代と動物をイギリスに輸入するための犬の健康証明書費用が2匹で3000ドル以上かかりました。高すぎっ。片道だし。
What made our trip to UK so much difficult than a simple flight is our dogs. Yes, we brought our dogs with us. Very, VERY, costly, and cumbersome endeavor.
First off, we needed to get a direct flight to England. Not that it was a requirement, but we wanted the shortest flight possible for the dogs who had to stay in the crate in a cargo for the duration of the flight (plus few hours before and after). So we were limited to the direct flight.
Then we were limited to American airlines (because the company is paying for the airfare). Which left us with either United or American. Then United cancelled a direct flight from our airport, and American said they don’t ship pets.
At this point, we even considered taking a Queen Elizabeth cruise to England but because of the pet health certificate and tapeworm treatment timing (explained further below), we had to ditch that idea.
The closest direct flight was from Houston, and we decided to drive 15 hours to Houston.
Before we started our journey, we first needed the pet health certificate in order for the dogs to go through the UK custom. It was good that we microchipped our little one a few years ago (our Blue Healer was microchipped when we adopted her). UK requires the dogs to be microchipped before rabies vaccines.
The health certificate had to be completed within 10 days of entering into the UK, and it had to be endorsed by USDA vet. Luckily, our vet was very familiar with the process. We went in for the check-up 1 week before our landing to UK. The health certificate was then over-nighted to New Mexico State Vet to be endorsed, then over-nighted back to our vet. Then we went back to our vet for tapeworm treatment that needed to be done within 5 days of entering into the UK. The vet added the tapeworm treatment on the certificate, then we received the health certificate, signed and embossed.
The other thing we had to do was to contact a company called PBS in the UK, which was a vendor for United’s pet shipping. For some reason, the UK requires the pet customs process to be handled exclusively by the authorized broker. So we had to give them the flight information and the customs documents prior to our arrival to the UK.
On Saturday, January 28, we drove my car to pick up a rental car. We had to get a minivan to fit the 2 crates (the cargo shipping requires sturdy crate; no foldable cage is allowed). We drove back the 2 cars, dropped off my car at our storage on the way back, went back to the apartment, loaded the dogs, the crates, and our suitcases, then drove the rental car and the MOTH’s truck to the storage to store MOTH’s truck, then off to Houston at 1:40 p.m.
We entered and crossed New Mexico fairly quickly, then entered into Texas… Texas is big. I mean, big. When we crossed Texas westward 10 years ago, it took us an entire day, and now we were doing it the other direction. We took a re-fuel/potty stop a couple of times, took a nap for a couple of hours past midnight (there is no drive-sharing in our household, by the way. It is strictly limited to MOTH driving all the way), drove on for several more hours, took another nap/potty time, ate brunch and Raising Cane’s, and 22 hours after leaving town, we finally reached the United’s cargo bay where the dogs would start their journey.
They tell you to be at the cargo 3 hours before the flight and they mean that. Workers there just hang around, chat, and show no sign of efficiency. Almost as if looking at government workers. Or are they union workers. Anyway, dogs got in their respective crate and locked, and the workers spent almost an hour to process the shipment. They were all speaking in Spanish with each other and didn’t tell us what they were doing so we just had to stand around and wait, looking at the dogs locked up in the crate.
When the workers finally completed whatever needed to be done, we hurried to return the rental car, took a shuttle to the terminal, and hopped on the airplane.
Flight itself was short (less than 9 hours) and uneventful. I was worried how the dogs were coping in the cargo but soon fell asleep with a help of Benadryl.
Once we got to Heathrow, we found out that we had to drive to a different part of the airport to pick up the dogs. We took a shuttle to a rental car place, pick up a station wagon, then drove to the airport’s animal center.
For the time it took us to go through immigration and picking up the rental car, you would think by now the dogs are ready to go. Oh no, they weren’t. We had to wait for nearly 2 hours to get the dogs out. The office is behind a locked door so we didn’t even know what was going on or how long this process would take. We were just left in the dingy lobby, with CCTV camera staring at us.
Thankfully, the dogs came out alive and well. Considering the decline of our little one’s health (nothing wrong, just old age and she’s getting very feeble), I really thought she might not make it but she did. Also, the workers did feed them so they were not starving.
We loaded them in the car (I had to hold our Blue Healer on my lap because of the limited space in the station wagon) and drove to our barn. It was 11:30 a.m. on Monday, January 30 when we finally reached our destination. Phew, it was a long trip.
So for those of you who may be considering traveling to the UK with dogs, I highly recommend doing a serious cost-benefit analysis, because it is very costly and tough and stressful on dogs. Here is our break-down of the cost:
-Crates: we had to buy a smaller crate for the little one. The airline also required 2 bowls for each crate. $100-$200.
-Vet fee for the health certificate and tapeworm treatment for 2 dogs: $550 (includes overnight costs so if you are in the area where the State vet is nearby, it will be cheaper)
-Cargo waybill for 2 dogs including the customs broker fee: $2,500
This makes it about $1,500-$1,600 per dog, one way. Double the cost of human airfare (our airfare was about $1,500 per person, round-trip).
And here are the tips and thoughts on air-shipping dogs:
-Do not medicate the dogs to sedate. You would think giving a Benadryl to the dogs before the flight may make them sleep through the process. But the airline may not let you ship the dog. There was a puppy also being processed at the cargo, and the workers were very suspicious that the puppy might have been sedated, and asking the owner about it (also saying if the puppy was sedated, they wouldn’t ship it).
-Pack a portion-size dog food in a ziploc bag. The workers at the cargo taped it on the crate. United did not allow medication in the dog food so I had to take out the pills unfortunately.
-We also had our leashes taped on the crate as well. When the dogs came out of the Heathrow Animal Center, they were on the leash, out of the crate.
-No toys in the crate (not allowed).
-Pee absorbing material in the crate. Our Blue Healer was able to hold pee but our little one did pee in the crate. If your crate pad is covered with nylon or other heavy-duty material, you will need something to absorb the pee.
-Have enough time for the shipping and reclaiming process. It’s a dilemma to go to the cargo too early because then the dogs will have to stay in the crate longer, but at the same time, if they are slow to process or if there are other animals that are being processed, it may take some time and you definitely don’t want to miss your flight.
So that’s that. I’m glad that this ordeal is past. I don’t want to think about doing this again on the way back to the US… Argh.
その上犬の飛行機代と動物をイギリスに輸入するための犬の健康証明書費用が2匹で3000ドル以上かかりました。高すぎっ。片道だし。
What made our trip to UK so much difficult than a simple flight is our dogs. Yes, we brought our dogs with us. Very, VERY, costly, and cumbersome endeavor.
First off, we needed to get a direct flight to England. Not that it was a requirement, but we wanted the shortest flight possible for the dogs who had to stay in the crate in a cargo for the duration of the flight (plus few hours before and after). So we were limited to the direct flight.
Then we were limited to American airlines (because the company is paying for the airfare). Which left us with either United or American. Then United cancelled a direct flight from our airport, and American said they don’t ship pets.
At this point, we even considered taking a Queen Elizabeth cruise to England but because of the pet health certificate and tapeworm treatment timing (explained further below), we had to ditch that idea.
The closest direct flight was from Houston, and we decided to drive 15 hours to Houston.
Before we started our journey, we first needed the pet health certificate in order for the dogs to go through the UK custom. It was good that we microchipped our little one a few years ago (our Blue Healer was microchipped when we adopted her). UK requires the dogs to be microchipped before rabies vaccines.
The health certificate had to be completed within 10 days of entering into the UK, and it had to be endorsed by USDA vet. Luckily, our vet was very familiar with the process. We went in for the check-up 1 week before our landing to UK. The health certificate was then over-nighted to New Mexico State Vet to be endorsed, then over-nighted back to our vet. Then we went back to our vet for tapeworm treatment that needed to be done within 5 days of entering into the UK. The vet added the tapeworm treatment on the certificate, then we received the health certificate, signed and embossed.
The other thing we had to do was to contact a company called PBS in the UK, which was a vendor for United’s pet shipping. For some reason, the UK requires the pet customs process to be handled exclusively by the authorized broker. So we had to give them the flight information and the customs documents prior to our arrival to the UK.
On Saturday, January 28, we drove my car to pick up a rental car. We had to get a minivan to fit the 2 crates (the cargo shipping requires sturdy crate; no foldable cage is allowed). We drove back the 2 cars, dropped off my car at our storage on the way back, went back to the apartment, loaded the dogs, the crates, and our suitcases, then drove the rental car and the MOTH’s truck to the storage to store MOTH’s truck, then off to Houston at 1:40 p.m.
We entered and crossed New Mexico fairly quickly, then entered into Texas… Texas is big. I mean, big. When we crossed Texas westward 10 years ago, it took us an entire day, and now we were doing it the other direction. We took a re-fuel/potty stop a couple of times, took a nap for a couple of hours past midnight (there is no drive-sharing in our household, by the way. It is strictly limited to MOTH driving all the way), drove on for several more hours, took another nap/potty time, ate brunch and Raising Cane’s, and 22 hours after leaving town, we finally reached the United’s cargo bay where the dogs would start their journey.
They tell you to be at the cargo 3 hours before the flight and they mean that. Workers there just hang around, chat, and show no sign of efficiency. Almost as if looking at government workers. Or are they union workers. Anyway, dogs got in their respective crate and locked, and the workers spent almost an hour to process the shipment. They were all speaking in Spanish with each other and didn’t tell us what they were doing so we just had to stand around and wait, looking at the dogs locked up in the crate.
When the workers finally completed whatever needed to be done, we hurried to return the rental car, took a shuttle to the terminal, and hopped on the airplane.
Flight itself was short (less than 9 hours) and uneventful. I was worried how the dogs were coping in the cargo but soon fell asleep with a help of Benadryl.
Once we got to Heathrow, we found out that we had to drive to a different part of the airport to pick up the dogs. We took a shuttle to a rental car place, pick up a station wagon, then drove to the airport’s animal center.
For the time it took us to go through immigration and picking up the rental car, you would think by now the dogs are ready to go. Oh no, they weren’t. We had to wait for nearly 2 hours to get the dogs out. The office is behind a locked door so we didn’t even know what was going on or how long this process would take. We were just left in the dingy lobby, with CCTV camera staring at us.
Thankfully, the dogs came out alive and well. Considering the decline of our little one’s health (nothing wrong, just old age and she’s getting very feeble), I really thought she might not make it but she did. Also, the workers did feed them so they were not starving.
We loaded them in the car (I had to hold our Blue Healer on my lap because of the limited space in the station wagon) and drove to our barn. It was 11:30 a.m. on Monday, January 30 when we finally reached our destination. Phew, it was a long trip.
So for those of you who may be considering traveling to the UK with dogs, I highly recommend doing a serious cost-benefit analysis, because it is very costly and tough and stressful on dogs. Here is our break-down of the cost:
-Crates: we had to buy a smaller crate for the little one. The airline also required 2 bowls for each crate. $100-$200.
-Vet fee for the health certificate and tapeworm treatment for 2 dogs: $550 (includes overnight costs so if you are in the area where the State vet is nearby, it will be cheaper)
-Cargo waybill for 2 dogs including the customs broker fee: $2,500
This makes it about $1,500-$1,600 per dog, one way. Double the cost of human airfare (our airfare was about $1,500 per person, round-trip).
And here are the tips and thoughts on air-shipping dogs:
-Do not medicate the dogs to sedate. You would think giving a Benadryl to the dogs before the flight may make them sleep through the process. But the airline may not let you ship the dog. There was a puppy also being processed at the cargo, and the workers were very suspicious that the puppy might have been sedated, and asking the owner about it (also saying if the puppy was sedated, they wouldn’t ship it).
-Pack a portion-size dog food in a ziploc bag. The workers at the cargo taped it on the crate. United did not allow medication in the dog food so I had to take out the pills unfortunately.
-We also had our leashes taped on the crate as well. When the dogs came out of the Heathrow Animal Center, they were on the leash, out of the crate.
-No toys in the crate (not allowed).
-Pee absorbing material in the crate. Our Blue Healer was able to hold pee but our little one did pee in the crate. If your crate pad is covered with nylon or other heavy-duty material, you will need something to absorb the pee.
-Have enough time for the shipping and reclaiming process. It’s a dilemma to go to the cargo too early because then the dogs will have to stay in the crate longer, but at the same time, if they are slow to process or if there are other animals that are being processed, it may take some time and you definitely don’t want to miss your flight.
So that’s that. I’m glad that this ordeal is past. I don’t want to think about doing this again on the way back to the US… Argh.
February 11, 2017
We Are In the UK
イギリスに着きました。何ていうか、超現実的でありつつ、とても現実。多分英語が通じて、生活環境があまり変わらないから巨大なカルチャーショックが無くて、あまりイギリスにいるという実感がありません。
30日にヒースロー空港に着いて、借り家に直行。家と言っても実は納屋なのです。納屋をとてもモダンにリフォームした家。イギリス1日目の夜は固い床に掛け布団を敷いてその上で寝ました。2日目には幸いエアベッドを買えたので寝心地はよし。床暖房なので、床冷えとか心配しなくていいのがいい。
毎日どんより曇り空か雨降りで、昨日からとうとう雪景色に突入したけど、ロンドン外苑から30分ぐらいのところなのにとても田舎で、まさにジェーン・オースティンの世界です。歌を歌いながら雨の中泥まみれになって犬の散歩をしています。そんなのもまたいいよね。
Our life in England has started. Surreal it is, though very
real. Probably because I understand the language (though struggling with the accent) and it is not visually too different from the US, I don't feel like I'm in a foreign country that much.
We arrived on the 30th, and had our very first
night in our barn (yes, we live in a converted barn) sleeping on the hard wood
floor. We bought a comforter at Asda, which is a counterpart of Walmart, and
slept on the comforter. Fortunately, we were able to find an air mattress the
next day, so it wasn’t too bad. Our barn has a heated floor so it’s rather hot
to sleep on the floor.
January 22, 2017
A Slouchy Hoodie: Jalie 3355
パーカー作りました。またシマシマ。どうもニット生地が縫うごとに伸びてしまって、予想よりもかなり大き目な、ゆるゆるパーカーになりました。
I made a hoodie. While I really like it and have worn it a few times already, it is pretty big and off my shoulder.
The fabric I used was a cotton 100%, labeled as sweatshirt knit, but the back side has loops so is it a French terry? While this fabric is really nice and cozy to wear, maybe because it has no Lycra in it, the fabric just grew and grew while I constructed, resulting in an unexpectedly slouchy hoodie.
The pattern is a Jalie 3355. which comes with a hoodie, sweatshirt, and sweat pants. See the pattern cover photo below. It shouldn't have been slouchy...
I cut a size S. I'm bigger at the waist but it's not fitted so no grading up.
Stripe matching 2 projects in a row. I traced the pattern off without a fold and cut the fabric with single layer.
I used my coverstitch machine to top stitch over the hood seam. The first 3 attempts miserably failed with a lot of skipped stitches so I put a scrap pattern tracing paper under the fabric and sewed it together, which worked.
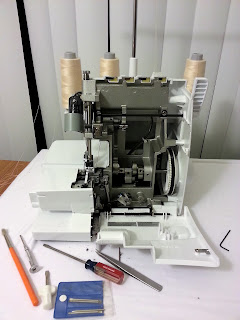
In the middle of the construction (attaching the hood to the neck line to be precise), my serger made a big clunking sound. When I opened the front cover, the stitch finger sprung out. After that, the timing of the loopers and needles went all wrong and needle was hitting the lower looper... I don't even know hot to open the plastic cover off my serger so what am I supposed to do?
Let's face it. My serger is a Brother 1034D, costs less than $200 brand new. Considering the possible repair costs, I might as well just buy a new 1034D... For 2 nights, I contemplated real hard. I checked the Craigslist, and I also considered (and leaning towards) maybe getting a slightly better serger since I do use my serger quite often.
The third night, the Man of the House rolled up his sleeve (only figuratively) and fixed my serger. He has no knowledge of sewing machine mechanism let alone a serger (which to me more complicated). I mean, he does not even know what the loopers are.
Anyway, it is fixed. I lost my excuse to buy a fancier serger.
Back to business. To stabilize the pocket opening, I added a twill tape and I did so on the right side to break down the stripe a bit. I like the effect.
I also added a fusible tricot on the wrong side to stabilize.
A strip of twill tape is also added to the shoulder/back neck seam as well.
This was my first hoodie, and it was much easier than I expected, construction wise. While the fabric has stretch, it just did not have much recovery so this is permanently slouchy. But, as I mentioned above, it's actually pretty nice as a lounging hoodie and I am reaching out to it over other RTW hoodies I already have. I definitely want to try again with proper fabric.
![]() |
| ユキも写りたいの |
The fabric I used was a cotton 100%, labeled as sweatshirt knit, but the back side has loops so is it a French terry? While this fabric is really nice and cozy to wear, maybe because it has no Lycra in it, the fabric just grew and grew while I constructed, resulting in an unexpectedly slouchy hoodie.
The pattern is a Jalie 3355. which comes with a hoodie, sweatshirt, and sweat pants. See the pattern cover photo below. It shouldn't have been slouchy...
![]() |
| 型紙のモデルはこんな感じ。 |
Stripe matching 2 projects in a row. I traced the pattern off without a fold and cut the fabric with single layer.
![]() |
| ストライプ柄は線を合わせるのが面倒くさい。 |
In the middle of the construction (attaching the hood to the neck line to be precise), my serger made a big clunking sound. When I opened the front cover, the stitch finger sprung out. After that, the timing of the loopers and needles went all wrong and needle was hitting the lower looper... I don't even know hot to open the plastic cover off my serger so what am I supposed to do?
Let's face it. My serger is a Brother 1034D, costs less than $200 brand new. Considering the possible repair costs, I might as well just buy a new 1034D... For 2 nights, I contemplated real hard. I checked the Craigslist, and I also considered (and leaning towards) maybe getting a slightly better serger since I do use my serger quite often.
The third night, the Man of the House rolled up his sleeve (only figuratively) and fixed my serger. He has no knowledge of sewing machine mechanism let alone a serger (which to me more complicated). I mean, he does not even know what the loopers are.
Anyway, it is fixed. I lost my excuse to buy a fancier serger.
![]() |
| ロックミシン、しばし壊れる。 |
I also added a fusible tricot on the wrong side to stabilize.
A strip of twill tape is also added to the shoulder/back neck seam as well.
This was my first hoodie, and it was much easier than I expected, construction wise. While the fabric has stretch, it just did not have much recovery so this is permanently slouchy. But, as I mentioned above, it's actually pretty nice as a lounging hoodie and I am reaching out to it over other RTW hoodies I already have. I definitely want to try again with proper fabric.
January 1, 2017
New Year Renfrew
あけましておめでとうございます。今年もよろしくお願いします。
今年は40という節目の年ということで、ぐうたら度低め、生産度高めな年にしたいと思います。
ちょうど1年前にも作ったカットソーの型紙の長袖・Vネックバージョンを作りました。
ほんっと言うとまたカウルネックを作りたかったんだけど、布が足らなかったので今回はVネック。
ミシン、ロックミシン、カバーステッチミシンと3台総出でアイロン台もミシン台として大活躍。
Funny that I made another Renfrew again around the New Year. New Year tradition now.
Last one was a cowl neck with 3/4 sleeves. I wanted to make another cowl with long sleeves but due to the fabric shortage, I made a V-neck version with long sleeves.
I am happy with the stripe matching.
The pattern was Sewaholic's Renfrew.
I cut a straight size 6, and lengthened the bodice by 1" this time.
This was actually my first time using the long sleeve pattern and I love the length of the sleeves. If I pull the sleeves, I can totally cover my thumb. If I wear it normally, the sleeve hem band nicely comes down to metacarprophalangeal joint (base of thumb).
The fabric is a navy blue and white stripe cotton jersey with 5% Lycra. Very nice and silky smooth and works well as neck/hem/sleeve band as well.
However, I only had 1 yard of fabric (59" wide). The fabric requirements suggested I needed 1 3/4 yards...
I traced the pattern and then cut the pattern with 1/4" seam allowance.
Oh, they fit! (Mostly thanks to Fabric Mart who gave me a few extra inches.)
I added a twill tape along the inside of shoulder and back neck seam to stabilize those area.
I also used my coverstitch machine to sew down the twill tape and top stitch around neck and hem.
The neck band is attached using the Jalie method where the ends of the neck band overlap instead of meeting at the center front. I added a little piece of tricot fusible interfacing at the point of the V neck
I still can't figure out how to get rid of the wrinkle from the underarm without adding darts, but other than that, I am very pleased with the results.
今年は40という節目の年ということで、ぐうたら度低め、生産度高めな年にしたいと思います。
ちょうど1年前にも作ったカットソーの型紙の長袖・Vネックバージョンを作りました。
ほんっと言うとまたカウルネックを作りたかったんだけど、布が足らなかったので今回はVネック。
ミシン、ロックミシン、カバーステッチミシンと3台総出でアイロン台もミシン台として大活躍。
![]() |
| I had to use my sewing machine, serger, and the coverstitch machine so my ironing board became a sewing table too. |
Last one was a cowl neck with 3/4 sleeves. I wanted to make another cowl with long sleeves but due to the fabric shortage, I made a V-neck version with long sleeves.
I am happy with the stripe matching.
The pattern was Sewaholic's Renfrew.
I cut a straight size 6, and lengthened the bodice by 1" this time.
This was actually my first time using the long sleeve pattern and I love the length of the sleeves. If I pull the sleeves, I can totally cover my thumb. If I wear it normally, the sleeve hem band nicely comes down to metacarprophalangeal joint (base of thumb).
The fabric is a navy blue and white stripe cotton jersey with 5% Lycra. Very nice and silky smooth and works well as neck/hem/sleeve band as well.
However, I only had 1 yard of fabric (59" wide). The fabric requirements suggested I needed 1 3/4 yards...
I traced the pattern and then cut the pattern with 1/4" seam allowance.
Oh, they fit! (Mostly thanks to Fabric Mart who gave me a few extra inches.)
I added a twill tape along the inside of shoulder and back neck seam to stabilize those area.
I also used my coverstitch machine to sew down the twill tape and top stitch around neck and hem.
The neck band is attached using the Jalie method where the ends of the neck band overlap instead of meeting at the center front. I added a little piece of tricot fusible interfacing at the point of the V neck
I still can't figure out how to get rid of the wrinkle from the underarm without adding darts, but other than that, I am very pleased with the results.
December 31, 2016
Christmas Gift to Myself
クリスマスという口実で、ロータリーカッターの刃とミシン針のまとめ買い。
ついでに今持ってる45ミリに加えて28ミリの小さいロータリーカッターも買っちゃった。
ちなみにこのオルファという会社名はカッターの替え刃がパキパキ折れるところから、「折る刃」を外来語風にしたのが由来らしいよ。裁縫業界では日本製品は海外でもかなり強いね。
ちなみにこれ全部で2万円ぐらいするんだよね。そんな高い買い物には見えないよね(爆)
Using Christmas as an excuse, I bought some (or 300) sewing machine needles, rotary cutter blades, and a new rotary cutter (28mm). (Yup, I like buying bulk)
I wanted a small rotary cutter for cutting paper patterns because my retractable craft knife gets dulled so quickly on the self healing mat.
It was funny that the blades I got were in totally Japanese original packaging, obviously not meant for oversea sale, although the image on Amazon was showing English on the package.
By the way, did you know that the name "Olfa" comes from Japanese words "oru-ha"? 'Oru' means to fold or break, and 'ha' means blades. Basically it comes from innovation of breakable retractable craft knife blades. So Olfa = breakable blades. A little trivia for you.
ついでに今持ってる45ミリに加えて28ミリの小さいロータリーカッターも買っちゃった。
ちなみにこのオルファという会社名はカッターの替え刃がパキパキ折れるところから、「折る刃」を外来語風にしたのが由来らしいよ。裁縫業界では日本製品は海外でもかなり強いね。
ちなみにこれ全部で2万円ぐらいするんだよね。そんな高い買い物には見えないよね(爆)
Using Christmas as an excuse, I bought some (or 300) sewing machine needles, rotary cutter blades, and a new rotary cutter (28mm). (Yup, I like buying bulk)
I wanted a small rotary cutter for cutting paper patterns because my retractable craft knife gets dulled so quickly on the self healing mat.
It was funny that the blades I got were in totally Japanese original packaging, obviously not meant for oversea sale, although the image on Amazon was showing English on the package.
By the way, did you know that the name "Olfa" comes from Japanese words "oru-ha"? 'Oru' means to fold or break, and 'ha' means blades. Basically it comes from innovation of breakable retractable craft knife blades. So Olfa = breakable blades. A little trivia for you.
December 30, 2016
Fixing the Hem
出来上がった赤ずきんちゃん風犬の雨合羽ですが、裾につけたパイピングが裾全体をフレアに広げてくれるのが気に入らなかったので、パイピングつけなおしました。
引っ張り目に付けなおしたら、裾がいい感じに犬の体にフィットするようになりました。
As I mentioned, I did not like how the piping was flaring up the hem of the dog coat, I re-attached the piping; this time pulling the piping as I sewed. So this time, the piping was about 3.5" shorter than it was, and the hem edge nicely hugs the body. Now I am happily done with the coat. Yey.
引っ張り目に付けなおしたら、裾がいい感じに犬の体にフィットするようになりました。
As I mentioned, I did not like how the piping was flaring up the hem of the dog coat, I re-attached the piping; this time pulling the piping as I sewed. So this time, the piping was about 3.5" shorter than it was, and the hem edge nicely hugs the body. Now I am happily done with the coat. Yey.
Subscribe to:
Posts (Atom)


