Pages

April 23, 2021

Campfire Quilt

ここ4か月、週日は仕事に追われ、土曜日は家のリフォーム作業、日曜は買い出し、掃除、洗濯、庭仕事で終わる日々が続き、全くお裁縫する時間がなかったです。
オットは先週2回目のコロナの予防接種を受けてきたんだけど、びっくりするほど副作用が出て土曜日のリフォーム作業がお休みになったので、重い腰を上げてほったらかしにしてあったパッチワークキルト完成させました。
キルト作るの、人生2度目。
去年の5月に作り始めて11か月で完成よ。
 

For the last four months, I have been deadly busy with work during the week, then busy with home renovation on Saturdays, then busy with housework on Sundays and had no time to do any sewing. However, last week, the Man of the House got his second COVID vaccine and he got really sick so we took a day off on Saturday from the renovation work. First free Saturday in, I don't know, many months! So I decided to jump deep into quilting.


I bought this Campfire Quilt by Suzy Quilts pattern and fabric kit a couple of years ago and actually started this project last May. 


I think I spent one day cutting, two days piecing, then one day making the quilt sandwich. 


This was my second quilt project in my life. I made my first quilt well over 20 years ago when I was still in Japan. I used my mother's sewing machine and made a log cabin quilt. My mother still has that quilt on her bed.

Funny how I picked another log cabin for my second quilt. This time though, I tried free motion quilting for the first time. I mean, it was even my first time putting the darning foot on my sewing machine. 

I made a practice quilt sandwich using the left-over fabric and scrap poly batting. I decided to stick with stippling (meandering pattern). It took me a while to get the rhythm, but it was kind of fun. Then I got cold feet when I faced the real deal and kind of set it aside...


Anyway, the time has come and I did my free motion quilting on my Campfire Quilt last weekend. There are so many mistakes and so many jagged turns but who cares, if I step away three feet, I don't notice it so I'm totally ok with it. I mean, working on a large size quilt is so much different from practicing on a small piece. 


I was able to finish quilting and binding before the end of the weekend, and after eleven months since I started this project, the quilt is done!


If you have an eagle eye, you will notice that I forgot to alternate the colored strips and cream background strips. Do I care? Nah. 


I really enjoyed making this quilt. Buying a kit really helped me because the color combination was what really appealed to me in the first place so it was nice to get exactly the same fabric all in one kit. 

While I have always liked quilts in general, I have realized I really like the modern quilt designs with solid color fabric and negative space. Solid color is soothing to me.

Although it took almost a year to complete, I am very happy with the finished project. It now lies proudly on my couch in my living room.

December 26, 2020

Dragon Backpack

先日のクジラの次はドラゴンです。それもただのぬいぐるみじゃなくて、ポケット付きで背中にかつげるドラゴンバックパック。
ユキにモデルになってもらいました。(すっごい嫌そうな顔してるけど)


Another minky sewing after the whale is a dragon. I made a dragon backpack.
The pattern is from Choly Knight "Backpack Dragon Plush Sewing Pattern." The pattern comes with two sizes of dragons: large and small. The pattern also comes with options for two eye designs: regular eyes and eyes with eyelashes. You can also choose from four horn shapes, four side fin shapes, and four wing shapes. I made a size small with regular eye, bent horn, and bat wings (basically the gray one shown on the pattern photo below).


The fabric is minky Cuddle 3 from Shannon Fabrics. Compared to the Lux minky I used for the whale, this one is a standard short hair minky and it was much easier to sew, and much less fluffy mess.


The eyes and nostrils are made from felt, and after fusing them with Wonder Under, I satin stitched around them to secure.


My sewing machine was sucking the fabric into the needle hole a lot despite using a brand new needle (I tried both ball point and universal) so I used small pieces of tissue paper for corners to stabilize.


As recommended in the instruction, I used the foam interfacing for the wings. The wings are attached at the center seam only and they flapped too much so I ended up tacking the wings about 1" away from the center seam after it was stuffed.


Looks a bit funny without the horns. Horns are the only piece that's not sewn in the seam. Horns are hand stitched on at the very end when the head is stuffed.


Yes, there is a pocket. The pattern comes with instructions for an additional pocket in the tail but I omitted that.


Completed and stuffed.


The pattern is very well designed and I really like the fact that the dragon's head is turned to one side. The overall proportion is just perfect. I stuffed it pretty well with Poly-Fil since this was for a 4-year-old and did not think he was going to actually use it to carry any personal items.


The pattern instruction is a whopping 45 page long, written with a very beginner sewer in mind. Very detailed instruction at every step. Even though I had some experience with sewing in general, the instruction helped me a lot in terms of sewing a plushy. 


The only problem I had with the pattern instruction is that the instruction texts are written in gray, not black. The instruction is all color so looks good on the computer screen but since I like printing out the instruction and I printed it black and white, the text written in gray is a bit difficult to read (I have bad eye sight). I just wish they were written in black. 

But otherwise, this pattern, with size options, detail options, and detailed instruction, is definitely worth every penny. Very good pattern and I am so happy with the results. 

December 17, 2020

Designer Stitch Callie Pinafore Dress

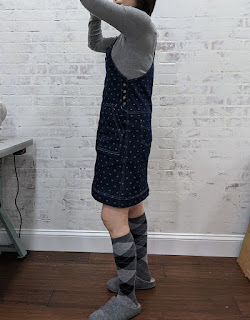
デニムのジャンパースカートを作りました。幼児期に戻った気分で。
生ひざ出してるしね。ハイソックスだしね。
それも水玉模様どころか、ハート柄のデニムです。


I made a denim jumper. Call me juvenile.
Oh, and please ignore the fluff on the floor. I was in the middle of minky sewing when I took these photos.


The pattern is Callie Pinafore Dress from Designer Stitch. It's an A-line shape jumper skirt pattern. There are different length options, back strap attachment and front strap attachment options, and pocket shape options. The pattern also comes with bust cup options of B, C, D, and DD. 


I chose: above knee length (20"), racer back, pointed bib pocket, slanted front patch pockets, and two back patch pockets. I changed the strap design so that I could use the overall buckles. I cut size 2.


The fabric is a stretch denim (3% lycra). It looks gray-ish in some photos (like the one below) but it's more dark denim blue. And it has hearts printed all over. Call me juvenile.


Oh yeah, my top stitching is not perfect (I mean, look at the pocket corner above) but I'm totally fine with it.


By the way, I love my seam stick. I bought this seam stick, which is basically a rather expensive piece of wood, when I won the Pattern Review's jeans contest last year. The wood surface is so smooth and it fits in a narrow tube like this strap. I don't get to use it often, but when I do, it does not disappoint me.


Speaking about disappointment. My side seam, front and back bodice, did not match. I measured the pattern, and unless I am somehow very wrong, the pattern did not match at the side seam either. I don't like that little jog there.


I used 4 jeans buttons (14 mm) per side (the pattern calls for 3). I actually broke one of the jean buttons, for which I did not have a spare. Unfortunately, it was a Prym jean button packet that I bought in the UK, and Dritz didn't have the exact same one. Well, thanks to Amazon, I was able to buy the Prym buttons (from Minerva Craft) and finished the jumper skirt with all matching side buttons.

To make the strap with overall buckle, lengthened the strap by 6". I think I could have gotten away with 4" extension and still plenty long enough to go through the buckle.

I also lowered the front patch pocket placement by 1 5/8". I basically made the whole skirt and put the pockets where I wanted them to be.

Also added 9mm rivets for pocket corners. Yes, I like hardware.

I was able to fit everything in 1.5 yard of fabric (52" wide). 


This was my first time using Designer Stitch pattern. I specifically picked this pattern over McCall's M7831 despite the indie pattern price because of the side button detail and many pocket options. I wanted all the details of the overall. The finished garment is exactly how I wanted it to be so I am very happy with it.

What I'm not 100% happy was that I struggled a bit with the instruction. I guess I got spoiled by Itch to Stitch's impeccable patterns and instructions.

I tried the "trimless" pattern option, which ideally could eliminate the need for trimming the printed papers when putting them together. Alas, my printer did not like it. No fault of the pattern at all, but I had to re-print all the 45 pages of the pattern pieces (and printed unnecessary pattern pieces because the instruction does not specify which pages to print for which cup sizes...)

Worn together with Itch to Stitch Hepburn turtle neck shirt (exact same alterations, same rib knit, but in different color).

December 12, 2020

Minky Whale

クジラのぬいぐるみ作りました。
もっすごい柔らかい、毛が長めのミンキー(って日本語でも言う?ニットでできてるフェイクファー)は、なでだしたら止まらないのよ。
でも毛が長いので、型を切ったあとは部屋中毛の残骸ですごいことになりました。


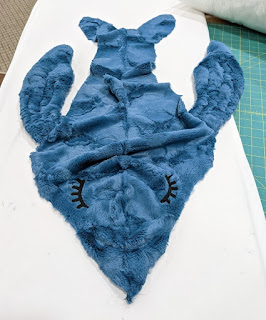
I made a whale softie. 
The pattern is Jersey Stuffed Animal 134 12/16 from Burdasyle. I got it as a free download earlier this year but looks like it may have been a limited time offer. It is now sold for $5.99.


The pattern called for jersey, velour, or sweatshirting, but I chose minky instead. The fabric, both the blue and the white, are long hair minky with some texture. It is called embossed Luxe Cuddle from Shannon Fabrics. Oh my, this fabric is so so soft. I kind of want this as my coat lining. Will it be too hot? The longer pile makes this really feel luxurious, but the longer pile also means huge mess when you cut it out. The Man of the House walked in and asked if I murdered an animal.


Fins. I used a walking foot for construction.


The pattern called for embroiderying the eyelashes. However, because of the long pile, I opted for an applique. I ironed on the Wonder Under on a piece of felt, cut out the eyelashes, ironed it on, then satin stitched around the edge. Not the perfect, professional looking satin stitches, but long pile hides the detail so not fussed about it.


Eyelashes and fins on.


It actually turned out to be smaller than I dreamed it to be. (No fault of the pattern.) But if I ever want to make it again and want to make it bigger, I can just print the pattern pieces large.


I really like how it turned out. I love the design and proportion. I think it's very simple but effective.
Well, now I have to vacuum all the fur bits that are flying around and tumbling on the floor.

November 10, 2020

Sewing Face Masks 5

3月から、マスク全部で321個作りました。
前に作ったのをちょっと改善して、息を吸ったときに布が顔に吸い付いてこないようにしてみました。
あれだね、日本はもともと花粉症とか風邪ひいたとき用に白いマスクを使うのが普通だったからみんな普通に白いマスクしてるけど、アメリカはマスクをつける習慣がなかった上に白いマスクとか出回ってなかったから普通に柄物マスク多いね。好きなスポーツチームの柄とか、ジョーク混じりな柄とか、子供はみんなキャラマスクとか。


So I have made 321 masks since March. Can I deduct the expenses from my tax?!
I made some upgrade to my mask so I thought I would document it here.

What's the update? I added a boning to my mask!


I am still using the Olson Mask pattern as the base. I liked the fit, especially with the chin darts I added to the pattern, but the fit and the coverage is so good that it actually creates vacuum when I breath in.


So I cut a strip of boning , 6" long, and sewed a channel to the wrong side of the lining piece, and inserted the boning.


The boning gives the mask a structured dome shape and it stays that way.


As I said above, I'm using the Olson Mask pattern but I simplified it so that there is no filter pocket. Just 2 layers of quilting cotton. I also modified the lining piece so that it's short at the sides (less bulk when you double-fold to make the elastic channel), and also shaved 1/8" top and bottom so that when you turn the mask right side out the edge of the lining piece won't show on the front.


Edge stitched at the bottom seam and top stitched at the top seam, wide enough to create a channel for the nose wire.


The new nose wires I bought was pre-cut at 4". Personally, I prefer 5" but oh-well.


I also added the silicone piece to the elastic so it's easy to adjust the elastic length.


The nose wire and the boning really help keep the three-dimensional shape of the mask.


The addition of the boning was a big hit (I mean, among friends and family). It's easier to breath and talk while wearing the mask. I actually wear it while I work on the home renovation project too and it's totally comfortable. So far the boning is withstanding the laundry. I think I am going to keep a couple in my bug-out bag (well, more like a bug-out "bin" that I keep in my tornado shelter).

November 7, 2020

Itch to Stitch Hepburn Turtleneck

寒くなってきたので、重ね着できるタートルネック作ってみた。
レーヨン/ポリエステル/スパンデックス混紡のリブニットです。
ピタピタフィットなので、カーディガンとかセーターを着てもぼこぼこしなくていい。

Now that the weather is getting cold, I made a turtle neck shirt that's perfect for layering.


The fabric is rayon/poly/Lycra rib knit. 


I cut size 2 at the bust and size 4 at the waist and hip. I guess I could just cut the straight size 4 next time. I shortened the sleeves by 1".


The pattern is designed with negative ease so the pattern pieces looked shockingly slim but the rib knit expands nicely.

There's not much to talk about; I really like the fit of Itch to Stitch patterns and this turtleneck is just so easy and quick to make. Wardrobe staple.

Worn together with Ginger jeans.