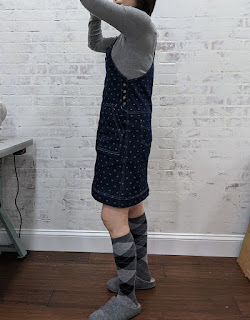
デニムのジャンパースカートを作りました。幼児期に戻った気分で。
生ひざ出してるしね。ハイソックスだしね。
それも水玉模様どころか、ハート柄のデニムです。
I made a denim jumper. Call me juvenile.
Oh, and please ignore the fluff on the floor. I was in the middle of minky sewing when I took these photos.
The pattern is Callie Pinafore Dress from Designer Stitch. It's an A-line shape jumper skirt pattern. There are different length options, back strap attachment and front strap attachment options, and pocket shape options. The pattern also comes with bust cup options of B, C, D, and DD.
I chose: above knee length (20"), racer back, pointed bib pocket, slanted front patch pockets, and two back patch pockets. I changed the strap design so that I could use the overall buckles. I cut size 2.
The fabric is a stretch denim (3% lycra). It looks gray-ish in some photos (like the one below) but it's more dark denim blue. And it has hearts printed all over. Call me juvenile.
Oh yeah, my top stitching is not perfect (I mean, look at the pocket corner above) but I'm totally fine with it.
Speaking about disappointment. My side seam, front and back bodice, did not match. I measured the pattern, and unless I am somehow very wrong, the pattern did not match at the side seam either. I don't like that little jog there.
I used 4 jeans buttons (14 mm) per side (the pattern calls for 3). I actually broke one of the jean buttons, for which I did not have a spare. Unfortunately, it was a Prym jean button packet that I bought in the UK, and Dritz didn't have the exact same one. Well, thanks to Amazon, I was able to buy the Prym buttons (from Minerva Craft) and finished the jumper skirt with all matching side buttons.
To make the strap with overall buckle, lengthened the strap by 6". I think I could have gotten away with 4" extension and still plenty long enough to go through the buckle.
I also lowered the front patch pocket placement by 1 5/8". I basically made the whole skirt and put the pockets where I wanted them to be.
Also added 9mm rivets for pocket corners. Yes, I like hardware.
I was able to fit everything in 1.5 yard of fabric (52" wide).
This was my first time using Designer Stitch pattern. I specifically picked this pattern over McCall's M7831 despite the indie pattern price because of the side button detail and many pocket options. I wanted all the details of the overall. The finished garment is exactly how I wanted it to be so I am very happy with it.
What I'm not 100% happy was that I struggled a bit with the instruction. I guess I got spoiled by Itch to Stitch's impeccable patterns and instructions.
I tried the "trimless" pattern option, which ideally could eliminate the need for trimming the printed papers when putting them together. Alas, my printer did not like it. No fault of the pattern at all, but I had to re-print all the 45 pages of the pattern pieces (and printed unnecessary pattern pieces because the instruction does not specify which pages to print for which cup sizes...)
Worn together with Itch to Stitch Hepburn turtle neck shirt (exact same alterations, same rib knit, but in different color).


No comments:
Post a Comment