すっかり人にあげるのに定番となりつつある「クレマチス」という名前のポーチをまた(1回目は茶色のタータンチェックで、2回目は青のタータンチェックで)作りました。
ハンドメイドって書いてある金具をまとめて買ったので(中国から送られてくるからさ、1か月ぐらい待つのよ、届くまで)つけてみました。
メインの布は、この前タートルネックを作ったケーブル柄にキルトされてるニット生地です。このコンビ、とても私の胸をつらぬいてくれるので、もう一つ自分用に作りたいかも。
Blue Calla's Clematis Wristlet has become my go-to pattern for a small handmade gift. (I have made a brown one and a blue one before.) I really like the pattern and I really like making it.
This time, I used the quilted knit I used for my Simplicity 8738 dropped shoulder turtle sweater. As I mentioned in that post, the fabric was kind of special to me because I bought it at the Knitting & Stitching Show in London, so I could not throw away any bits of the leftover fabric. Clematis uses very little fabric for the main part of the exterior body, so this was a perfect project.
The accent part and the strap is a textured vinyl in pearlescent pink.
The lining fabric was a pink colorway fat quarter bundle from Art Gallery.
I bought a bunch of "handmade" metal labels and they had just arrived in time, so it made it onto the Clematis. I really like the whole look and I might have to just make one more for myself.
November 29, 2019
November 24, 2019
Reupholstering Dining Chairs
砂漠地帯の倉庫に2年しまわれていた家財道具は、たぶん倉庫内の熱さで色んな物がボロボロになりました。タッパーのプラスチックの蓋とかペキペキに砕けたり。
食卓の椅子は、10年ぐらい前に中古で買ったんだけど、荷ほどきをしてみたら、使っていた時にはなかったシミが座面の布に沢山現れた上に、その座面の布は紙が破けるみたいに簡単に裂けてしまいました。
そんなわけで、座面の布の張替え決行。
ちょうど義父が泊っているので、義父とオットが親子二人でやってくれました。私は横でマルガリータ飲みながら監督役。
A lot of weird things happened to the stuff that were stored in the storage for two years in the Desert Southwest. The lids of the Pyrex containers crumbled like pie shells (but not other el cheapo container lids) and things got weirdly crummy.
Our dining chairs were bought about 10 years ago as a second-hand. When we stored them in the storage, we broke down the chair legs to save storage space and the seats were put in a box. For some reason (most likely heat, considering the storage was not climate controlled), while they were in the storage, a lot of stains that were not there before surfaced on the fabric. Also, the fabric disintegrated and ripped like a tissue paper.
So we decided to reupholster the chairs. I ordered some fabric swatches and decided on a simple basket weave upholstery fabric.
Luckily, MOTH's father is visiting us so the two of them got to work and I was able to avoid the task.
I just sat there and enjoyed my margarita.
No more stains! No more rips!
食卓の椅子は、10年ぐらい前に中古で買ったんだけど、荷ほどきをしてみたら、使っていた時にはなかったシミが座面の布に沢山現れた上に、その座面の布は紙が破けるみたいに簡単に裂けてしまいました。
そんなわけで、座面の布の張替え決行。
ちょうど義父が泊っているので、義父とオットが親子二人でやってくれました。私は横でマルガリータ飲みながら監督役。
A lot of weird things happened to the stuff that were stored in the storage for two years in the Desert Southwest. The lids of the Pyrex containers crumbled like pie shells (but not other el cheapo container lids) and things got weirdly crummy.
Our dining chairs were bought about 10 years ago as a second-hand. When we stored them in the storage, we broke down the chair legs to save storage space and the seats were put in a box. For some reason (most likely heat, considering the storage was not climate controlled), while they were in the storage, a lot of stains that were not there before surfaced on the fabric. Also, the fabric disintegrated and ripped like a tissue paper.
So we decided to reupholster the chairs. I ordered some fabric swatches and decided on a simple basket weave upholstery fabric.
Luckily, MOTH's father is visiting us so the two of them got to work and I was able to avoid the task.
I just sat there and enjoyed my margarita.
November 13, 2019
McCall's 7016 Shawl Collar Sweater
ここ2週間ぐらい、家のペンキ塗りに追われてかなり疲れ気味。毎日夜3時間ぐらいペンキ塗ってる。それでも終わらないのね。一体いつまで続くかな。
この前犬が乗ってたセーターです。
布はオットに作ったトップと同じ布。出来上がりは、悪くはないんだけど、ちょっと微妙。衿がちょっと前身ごろでパカパカするのよね。
This is the sweater the Dog was nesting on the other day. The pattern is McCall's 7016. I bought this pattern several years ago, thinking that the dress version (the version the model is wearing on the pattern envelope) would be nice to wear to work. Now that I don't need any "office appropriate" clothes since I work in my basement, I made a top version for a more casual wear.
The fabric is the same one I used for MOTH's Jalie 2212 half zip pull over: fleece backed rayon/poly/lycra sweater knit.
I cut a size Small. I guess because this is a relatively figure-hugging knit dress pattern, it was true to size despite being a "Big 4" pattern. My adjustments were:
-Narrow shoulder 1"
-Grade out 1/2" at waist
-Shorten sleeve 1.5"
Then came the collar. First, the collar has a center back seam but I cut the fabric on fold. Then I read on Pattern Review that the collar is quite big, so I narrowed it by 1" at the center back then merged to the original line. Below, the red is my new narrowed cut line, and the black is the original cut line.
The pattern calls for stay stitching around the neck line but I just added a 1/4" clear elastic when I attached the collar piece.
But then I realized that I attached the collar piece on the wrong side... The seam with the clear elastic is now on the public side of the garment. Luckily, the shawl collar covers the seam so I went with it. The good news is that now the neck line inside the garment looks nice :P
I'm somewhat on the fence about this top. I think I need to size up so that I can wear a long sleeve T-shirt underneath. It is cozy with the shawl collar, but as a "sweater," it needs a bit more wearing ease.
I screwed up the hem. The two layers of the front bodice are not sitting correctly because I didn't consider the turn of cloth of the outer layer. Does it bother me enough to unpick stitches and re-hem? Nah.
Also, the collar is still not quite right. It gapes. I may have to shorten the collar to make it hug a bit or something.
この前犬が乗ってたセーターです。
布はオットに作ったトップと同じ布。出来上がりは、悪くはないんだけど、ちょっと微妙。衿がちょっと前身ごろでパカパカするのよね。
This is the sweater the Dog was nesting on the other day. The pattern is McCall's 7016. I bought this pattern several years ago, thinking that the dress version (the version the model is wearing on the pattern envelope) would be nice to wear to work. Now that I don't need any "office appropriate" clothes since I work in my basement, I made a top version for a more casual wear.
The fabric is the same one I used for MOTH's Jalie 2212 half zip pull over: fleece backed rayon/poly/lycra sweater knit.
I cut a size Small. I guess because this is a relatively figure-hugging knit dress pattern, it was true to size despite being a "Big 4" pattern. My adjustments were:
-Narrow shoulder 1"
-Grade out 1/2" at waist
-Shorten sleeve 1.5"
Then came the collar. First, the collar has a center back seam but I cut the fabric on fold. Then I read on Pattern Review that the collar is quite big, so I narrowed it by 1" at the center back then merged to the original line. Below, the red is my new narrowed cut line, and the black is the original cut line.
The pattern calls for stay stitching around the neck line but I just added a 1/4" clear elastic when I attached the collar piece.
But then I realized that I attached the collar piece on the wrong side... The seam with the clear elastic is now on the public side of the garment. Luckily, the shawl collar covers the seam so I went with it. The good news is that now the neck line inside the garment looks nice :P
I'm somewhat on the fence about this top. I think I need to size up so that I can wear a long sleeve T-shirt underneath. It is cozy with the shawl collar, but as a "sweater," it needs a bit more wearing ease.
I screwed up the hem. The two layers of the front bodice are not sitting correctly because I didn't consider the turn of cloth of the outer layer. Does it bother me enough to unpick stitches and re-hem? Nah.
Also, the collar is still not quite right. It gapes. I may have to shorten the collar to make it hug a bit or something.
November 11, 2019
D20 Sack Bag
甥の誕生日に、きのこの山を買いました。うち、かわいいラッピングペーパーとか常備してないので、サイコロ袋のあまり布でリュック型きんちゃく袋を作って入れました。
I bought a couple of Japanese snacks for my American Nephew #2's birthday. Since I don't have any wrapping paper, I made a sack bag.
I used the d20 theme fabric (left over from the d20 dice bag for his dad). After cutting the fabric, I realized that it was ever so slightly too short for a sack bag ratio, so I added a grosgrain ribbon at the top for a channel.
French seamed the inside.
I bought a couple of Japanese snacks for my American Nephew #2's birthday. Since I don't have any wrapping paper, I made a sack bag.
I used the d20 theme fabric (left over from the d20 dice bag for his dad). After cutting the fabric, I realized that it was ever so slightly too short for a sack bag ratio, so I added a grosgrain ribbon at the top for a channel.
French seamed the inside.
November 7, 2019
Jalie 2212 Men's Pull-Over Shirt #2
珍しく、オットの服を作りました。実は男物の服を作るの結構好き。ダーツとかないから。
前にフリースで作ったのとまったく同じです。
今回は裏がフリースなレーヨン・ポリエステルの混紡ニットで。
I made a half-zip pull-over top for the Man of the House. The pattern is Jalie 2212. I made a fleece version last year and he actually wore it often so made another one. Straight size T and no adjustments.
The fabric is a rayon/poly/Lycra blend knit with fleecy back. The below photo looks gray but it is dark blue.
I like how all the pattern pieces fit in the fabric without a lot of waste.
I had salvaged a few zippers from a fanny pack I had a few years ago, and the salvaged zipper along with the zipper pull was perfect for this project.
There is a lot of top stitching to keep the seam allowances down on this shirt. I was using the chain stitch on my coverstich machine but I was a bit worried about fabric stretching out under the pressor foot so I laid long pieces of my pattern paper scraps (medical exam table paper) under the fabric to stabilize.
I attached a lingerie elastic around the neck. My stitching wasn't perfect and I did not have a thread that matched the color of the elastic so my not-so-perfect stitching line is pretty obvious but oh well.
When I gave this to MOTH, he was like "Isn't this a bit grandpa-y?" not realizing it's the exact same one as the gray top he frequently wears... Men... He has worn it once (hence the picture) so far. Well, we shall see if he will wear it more as the weather cools.
MOTH and I are pretty much the same size so I tried it on, too, and I kind of like it. The sleeves are too long on me, but other than that, it fit me well. I will make one for myself in the future.
前にフリースで作ったのとまったく同じです。
今回は裏がフリースなレーヨン・ポリエステルの混紡ニットで。
I made a half-zip pull-over top for the Man of the House. The pattern is Jalie 2212. I made a fleece version last year and he actually wore it often so made another one. Straight size T and no adjustments.
The fabric is a rayon/poly/Lycra blend knit with fleecy back. The below photo looks gray but it is dark blue.
I like how all the pattern pieces fit in the fabric without a lot of waste.
I had salvaged a few zippers from a fanny pack I had a few years ago, and the salvaged zipper along with the zipper pull was perfect for this project.
There is a lot of top stitching to keep the seam allowances down on this shirt. I was using the chain stitch on my coverstich machine but I was a bit worried about fabric stretching out under the pressor foot so I laid long pieces of my pattern paper scraps (medical exam table paper) under the fabric to stabilize.
When I gave this to MOTH, he was like "Isn't this a bit grandpa-y?" not realizing it's the exact same one as the gray top he frequently wears... Men... He has worn it once (hence the picture) so far. Well, we shall see if he will wear it more as the weather cools.
MOTH and I are pretty much the same size so I tried it on, too, and I kind of like it. The sleeves are too long on me, but other than that, it fit me well. I will make one for myself in the future.
November 1, 2019
Nesting Dog
セーターが一つできたので早速写真撮ろっと思って床に広げてみたら、速攻でユキに乗られた。
最初はちょっとだけ乘ってたのが、目を離したすきに動いて完全にセーターの上に乘ってた。床にある布はすぐ自分の巣だと思っているようだ。もうあきらめた。
So I made this top and thought I would take a flat photo. But as soon as I laid the sweater on the floor, the dog came and sat on it.
First she was just on it partially, but while I stepped out of the room for a second, she evidently moved and totally nested on my brand-spanking-new, hot-out-of-the-serger sweater.
Just to be clear, she has her bed in this room. But no, she would have to check out the new fabric on the floor and claim it. I don't know what's with her nesting but at this point, I just give up and wait for her to move to a new location.
最初はちょっとだけ乘ってたのが、目を離したすきに動いて完全にセーターの上に乘ってた。床にある布はすぐ自分の巣だと思っているようだ。もうあきらめた。
So I made this top and thought I would take a flat photo. But as soon as I laid the sweater on the floor, the dog came and sat on it.
First she was just on it partially, but while I stepped out of the room for a second, she evidently moved and totally nested on my brand-spanking-new, hot-out-of-the-serger sweater.
Just to be clear, she has her bed in this room. But no, she would have to check out the new fabric on the floor and claim it. I don't know what's with her nesting but at this point, I just give up and wait for her to move to a new location.
October 29, 2019
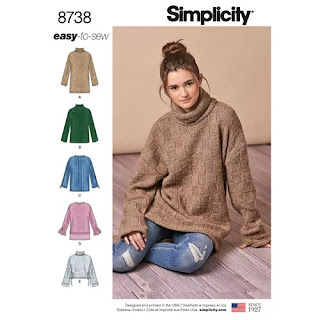
Dropped Shoulder Sweater: Simplicity 8738
やっと秋らしく涼しくなりました。でも涼しくなったと思ったらもう急に寒くなったので、あったかめの服を作りました。
布は去年ロンドンで買った、編み物柄にキルトされてるニットです。
Once the autumn hit my area, it got really cold all of a sudden so I'm in a full winter sewing mode. Funny I actually just made four Sewaholic Renfrew shirts before this project (unblogged), two of which were short sleeve T-shirts.
The pattern is Simplicity 8738. I made a view B, tunic length, turtle neck.
The fabric is a poly/rayon blend quilted knit that I bought at Knitting and Stitching Show in London last year. I actually saw this knit on YouTube and had been checking on Higgs & Higgs website for like a year (fabric was pricier in general in England) but then at Knitting Stitching Show, my wallet was kinda loose.
I measured my men's hoodie I happened to be wearing and by comparing it to the finished measurement of the pattern, I decided to cut a size XS. I shortened the bodice by 2" and shortened the sleeves by 2".
Then came the neck band (the turtle neck). I sewed the ends together to a make a tube, folded in half, and it looked, you know, extra small, as the pattern size may suggest. And it did not even go over my forehead. I am short, but I am known to have a big head, both figuratively and literally.
Of course I did not check the stretch gauge on the envelope before I started the project. It's an oversize sweater so I didn't even think about stretch percentage.
I re-cut the neck band for size XXL (yes, my head is that big), and also re-cut the bodice neck line for XXL to match.
I like it, but I think I did not do justice to both the fabric and the pattern. I think I need to go up a size to Small, which is what the pattern suggests for my body measurements. I know it sounds funny to go up a size when there is already so much ease. But I think the sleeve/shoulder junction needs to drop down a little further, and just a bit more ease to make it look intentionally oversized.
And I think this quilted knit was too stable for this pattern. I originally earmarked this fabric for Jalie 2795 (zip front jacket). The fabric is great (though it does feel very polyester) but it just does not have the drape. A Jalie jacket would have been a better pattern for the fabric. This is totally my fabric/pattern matching error. But that's what happens when the weather gets cold and I want a big cozy turtleneck.
I will come back to this pattern again when I find a nice chunky sweater knit.
布は去年ロンドンで買った、編み物柄にキルトされてるニットです。
Once the autumn hit my area, it got really cold all of a sudden so I'm in a full winter sewing mode. Funny I actually just made four Sewaholic Renfrew shirts before this project (unblogged), two of which were short sleeve T-shirts.
The pattern is Simplicity 8738. I made a view B, tunic length, turtle neck.
The fabric is a poly/rayon blend quilted knit that I bought at Knitting and Stitching Show in London last year. I actually saw this knit on YouTube and had been checking on Higgs & Higgs website for like a year (fabric was pricier in general in England) but then at Knitting Stitching Show, my wallet was kinda loose.
I measured my men's hoodie I happened to be wearing and by comparing it to the finished measurement of the pattern, I decided to cut a size XS. I shortened the bodice by 2" and shortened the sleeves by 2".
Then came the neck band (the turtle neck). I sewed the ends together to a make a tube, folded in half, and it looked, you know, extra small, as the pattern size may suggest. And it did not even go over my forehead. I am short, but I am known to have a big head, both figuratively and literally.
Of course I did not check the stretch gauge on the envelope before I started the project. It's an oversize sweater so I didn't even think about stretch percentage.
I re-cut the neck band for size XXL (yes, my head is that big), and also re-cut the bodice neck line for XXL to match.
I like it, but I think I did not do justice to both the fabric and the pattern. I think I need to go up a size to Small, which is what the pattern suggests for my body measurements. I know it sounds funny to go up a size when there is already so much ease. But I think the sleeve/shoulder junction needs to drop down a little further, and just a bit more ease to make it look intentionally oversized.
And I think this quilted knit was too stable for this pattern. I originally earmarked this fabric for Jalie 2795 (zip front jacket). The fabric is great (though it does feel very polyester) but it just does not have the drape. A Jalie jacket would have been a better pattern for the fabric. This is totally my fabric/pattern matching error. But that's what happens when the weather gets cold and I want a big cozy turtleneck.
I will come back to this pattern again when I find a nice chunky sweater knit.
October 25, 2019
Sewing a Shift Boot with My New Juki
中古のミシンを買いました。メイドインジャパン。実はこれ、オットからの3年遅れのクリスマス・結婚記念日祝い。
The first project with my industrial Juki is a new shift boot for MOTH's car. The current one is in a pretty poor condition: disintegrating badly and the vinyl was falling apart as you touched it.
I had never made a shift boot before, but after watching some YouTube tutorials, it looked pretty simple. (And it indeed is.)
1. Take it apart and trace the shape of the panel.
2. Add a seam allowance.
3. Cut the vinyl. MOTH wanted a leather boot but I wanted a prototype to practice so I bought some fleece backed vinyl. My boot had 4 panels and they were all different shape. I numbered them so I would know how the panels fit.
4. Sew the panels together and top stitch. Oh, my, god. Compound feed industrial machine is amazing. So, so amazing.
Tada~.
I was a bit worried that the shape of the base was not quite a symmetrical trapezoid, but that was how the frame piece was shaped. Phew. The boot actually fit perfectly.
This was supposed to be a practice run, but I think this is it, unless MOTH decides he really wants a leather boot. It was only 4 seams to sew and topstitch, but it feels like quite an accomplishment. LOVE IT!
新しい(中古だけど)ミシンでのプロジェクト第一号は、オットの車のシフトブーツ。
現存のシフトブーツはもうボロボロどころか、触るだけで表面のビニールがポロポロはげ落ちてくる状態でした。
皮で作って、って頼まれたんだけど、とりあえず練習用にビニール布で作ってみました。
初めて作った割にはけっこう完ぺき。自画自賛。練習用と言わず、もうこれで完成。
I bought a second-hand industrial Juki. It's actually a wedding anniversary & Christmas gift from the Man of the House that was promised to me 3 years ago.
The first project with my industrial Juki is a new shift boot for MOTH's car. The current one is in a pretty poor condition: disintegrating badly and the vinyl was falling apart as you touched it.
I had never made a shift boot before, but after watching some YouTube tutorials, it looked pretty simple. (And it indeed is.)
1. Take it apart and trace the shape of the panel.
2. Add a seam allowance.
3. Cut the vinyl. MOTH wanted a leather boot but I wanted a prototype to practice so I bought some fleece backed vinyl. My boot had 4 panels and they were all different shape. I numbered them so I would know how the panels fit.
4. Sew the panels together and top stitch. Oh, my, god. Compound feed industrial machine is amazing. So, so amazing.
Tada~.
I was a bit worried that the shape of the base was not quite a symmetrical trapezoid, but that was how the frame piece was shaped. Phew. The boot actually fit perfectly.
This was supposed to be a practice run, but I think this is it, unless MOTH decides he really wants a leather boot. It was only 4 seams to sew and topstitch, but it feels like quite an accomplishment. LOVE IT!
Subscribe to:
Posts (Atom)


